gluten-free

Delicious Chocolate Cupcakes | Gluten-Free | Allergen-Friendly

blue_cupcake

Your next birthday party, celebration or ….just any old day…will not be the same with these cupcakes as the centerpiece.

MAKES: 2 DOZEN

INGREDIENTS

CUPCAKES
1 ½ cups granulated organic sugar
2 cups Bob's Red Mill Gluten-free 1 - 1 Flour
¾ cup unsweetened cocoa
1 ½ tsp baking powder
1 ½ tsp baking soda
1 tsp salt
2 large eggs
1 cup milk (or substitute)
½ cup vegetable oil
1 ½ tsp vanilla
¾ cup boiling water

FROSTING
1 Color Kitchen Frosting Mix (choose your color) with sprinkles
OR
1 Color Kitchen Plain Frosting Mix with Color of your choice
½ cup butter (or substitute)
1 ½ tbsp milk (or substitute)
1 tsp vanilla

INSTRUCTIONS

Preheat oven to 350 degrees.

Line cupcake tins with paper liners.

In a large mixing bowl, stir together dry ingredients.

Add eggs, milk, oil, and vanilla and blend with a mixer on medium speed for 1-2 minutes.

Stir in boiling water. Blend for another 30 seconds.

Spoon batter evenly into cupcake liners. Bake for 20 to 25 minutes, or until a toothpick comes out clean.

Remove from oven. Completely cool before frosting cupcakes.

Mix frosting, following instructions on packaging.

Put frosting into a piping bag. Frost cupcakes and top with sprinkles!

Easter Bunny Pancakes | Gluten-free

Gluten-free Rainbow Easter Bunny Pancakes

Hop to it and make this cute breakfast your kids are sure to love! Enjoy a colorful breakfast free from artificial dyes with natural coloring from plant-sources like beets and turmeric. It’s so easy with our gluten-free mix that comes with rainbow colors!

MAKES: 4 BUNNY PANCAKES
Cook Time: 20 minutes

Ingredients

1 Color Kitchen Gluten-free Rainbow Pancake Mix
1 ½ cup milk (or substitute)
2 tbsp melted butter or oil
2 eggs (or egg substitute)
½ cup whipped cream

Directions

Blend pancake mix with milk, butter and eggs. Split batter into 4 bowls, approx ¾ cup each. Add 1 color packet to each bowl and blend until all the color has dissolved.

Heat a skillet to medium-low heat. With the pink batter, make large (about 4-inch) circles on the skillet for the body. For the head, use the yellow batter to make medium (about 2-inch) circles.  Using the green batter, make small (about 1-inch) circles for the feet.  And lastly, for the ears use the blue batter, making small (about 2-inches x 1 inch) ovals. Cook all pancakes for about 2 minutes on each side.

Assemble the bunny. Place the blue ears at the top of a plate. Place the yellow head slightly overlapping the bottom of the ears.  Place the pink body pancake below the head, slightly overlapping. Place two green feet pancakes at the bottom, slightly overlapping the body. Place a dollop of whipped cream on the body just above the feet to make a tail.

Top with butter or syrup to your liking and enjoy!


Lemon Pistachio Macaroons | Gluten-free | Vegan-friendly

Pistachio Macaroon Natural Sprinkle

Soft and chewy, lemon-zesty coconut macaroons are the prefect sweet treat for a gluten-free diet.

MAKES: 10 MACAROONS
Prep time: 10 minutes

Ingredients

1 ⅓ cup finely shredded coconut
¼ cup almond flour
¼ cup honey (or coconut nectar)
3 tbsp coconut oil, at room temperature
1 tbsp lemon juice
1 tbsp lemon zest
¼ tsp salt
½ cup finely chopped pistachios
1 Color Kitchen Plain Frosting Mix
1 Color Kitchen Green Color Packet
1 Color Kitchen Nonpareil Sprinkles
3 tbsp milk (or milk alternative)
1 tsp vanilla

Pistachio Macaroon Natural Sprinkles

Directions

Preheat the oven to 350 degrees.  Line a baking sheet with parchment paper.

Add the coconut, almond flour, honey, coconut oil, lemon juice, lemon zest, and salt to a food processor.  Pulse 15-20 times, until all of the ingredients come together in a soft dough. 

Transfer the dough to a bowl.  Using a spatula, fold in the chopped pistachios.

Shape the dough into 10 balls.  Place on the baking sheet and bake for 16 minutes.

While the macaroons are baking, prepare the icing.  Add the powdered sugar, color packet, milk, and vanilla extract to a bowl and mix until evenly combined.

Once the macaroons have cooled, drizzle on the icing and top with nonpareil sprinkles.

4th of July Cupcakes | Gluten-free

natural frosting

Happy 4th! Celebrate with gluten-free cupcakes topped with naturally colored buttercream.

CUPCAKES

1 ¼ cups all purpose gluten free flour (I used @bobsredmill)
1 ½ tsp baking powder
¼ tsp baking soda
¼ tsp sea salt
2 eggs, room temp
6 tbsp non-dairy butter
½ cup coconut sugar
½ cup non dairy milk
1 ½ tbsp avocado oil, or neutral oil
1 tbsp vanilla extract

BUTTERCREAM

4 cups unrefined powdered sugar or powdered monkfruit
1 cup non-dairy butter
2 tbsp non-dairy milk
1 tsp vanilla extract
¼ cup red, white & blue sprinkles
1 Color Kitchen Blue and Pink Color Packets (add a little Orange to Pink for deeper red color)

natural color frosting

DIRECTIONS

Preheat oven to 350F and line muffin tin with wrappers.

In a medium bowl, mix together flour, baking powder/soda and salt.

In another large bowl, beat together coconut sugar & non-dairy butter with a hand mixer or stand mixer for 3-5 mins until smooth. Do not skimp on the beating, this is what makes the cupcakes soft and fluffy!!

Now mix in eggs, milk, oil & vanilla and beat until well combined. Mix in dry ingredients and beat again until smooth and creamy, about 2 min.

Scoop batter into lined muffin tin, about 2/3 way up evenly across the 12 liners.

Bake 16-18 mins until tops are brown and bounce back when lightly poked. Let cool on cooling rack until completely cool.

Beat together all buttercream ingredients with a mixer until a smooth frosting forms. Divide up the frosting into 3 bowls and add ½ - full color packet into 2 bowls. Leave one bowl for white. Mix well. Add all 3 frostings into a piping bag, trying not to mix them.

Cut little circles into the cupcakes and remove the cake. Then fill with patriotic sprinkles (or berry jam!) and place the cake piece back on. Pipe frosting over, or frost each color with a butterknife. Store in fridge for up to 5 days in an airtight container.


~Gutsy Baker, Stephanie Charbonneau

ANIMAL CRACKERS WITH MARBLED ICING | GLUTEN-FREE | ALLERGEN-FRIENDLY | VEGAN-FRIENDLY

AnimalCrackers_Plate_BLOG.jpg

Animal Cracker cookies are a childhood favorite, but not easily found with allergen-friendly or gluten-free options.

Here are a couple brands that make gluten-free and allergen-friendly animal crackers, but you’ll have to decorate them yourself to get those colorful cookies with nonpareil sprinkles: Glutino Animal Crackers (gluten and soy-free) and Kinnikinnick Gluten-free Animal Cookies (gluten-free, dairy-free, nut-free).

ICING

MAKES: About 5 dozen cookies

INGREDIENTS

1 Color Kitchen Frosting Mix (choose your color!) with sprinkles
1 additional Color Kitchen color packet
milk or substitute
vanilla
coconut oil (optional)

DIRECTIONS

Put powdered sugar in medium sized mixing bowl and add 3 tbsp milk and ½ tsp vanilla. Stir with spoon or hand mixer on low. Add 1-2 more tsp milk depending on desired thickness.

Mix until smooth. Pour ⅓ cup icing (each) into 2 small bowls. Set aside remaining icing for white.

Open color packets and add ½ tsp of color to each icing bowl and stir. Add more color to get deeper shades. Stir until all the powder color is dissolved. Keep unused color airtight in packets.

If icing is still too thick, add ½ tsp milk at a time and stir until desired consistency is reached. Add ½ tsp melted coconut oil for sheen.

Dip cookie half way in one color of icing and then in a second color and twist, to get a marbled effect. Or colors can be combined into one larger bowl. If combining, do not mix colors together, but swirl once with a spoon, so when dipping cookies get coated by multiple colors.

While still wet, add a pinch of sprinkles over cookies. Allow to dry overnight.

Allergen Friendly Chocolate Birthday Cake | Dairy-free | Egg-free | Gluten-free | Low Glycemic | Vegan

PinkCake_web.jpg

If you’re looking for an allergen or vegan-friendly birthday cake without all the sugar, but still satisfies your sweet tooth, here’s the recipe for you! This cake is perfect for birthdays, being free from allergens, so everyone can enjoy a slice.

PinkCake_Slice_web.jpg

Ingredients

3 cups Bob's Red Mill Gluten-free 1 - 1 Flour
1 ½ cups allulose sweetener (recommended Trader Joe’s allulose/stevia blend)
6 tbsp unsweetened cocoa powder
2 tsp baking soda
1 tsp salt
2 cups milk substitute
½ cup canola oil
2 tbsp apple cider vinegar
1 tsp vanilla

FROSTING
1 Color Kitchen Frosting Mix (choose your color!) with sprinkles

Directions

Preheat the oven to 350 degrees and oil two 9-inch cake pans.

In a medium bowl combine the flour, sweetener, cocoa powder, baking soda and salt.

In a smaller bowl blend milk substitute, oil, vinegar and vanilla.

Combine the wet ingredients into the dry ingredients and mix with a hand or stand mixer, scraping the sides of the bowl until fully blended.

Pour into cake pans and place in oven. Bake for 25 minutes, or until a toothpick comes out clean.

Cool before frosting.

For the frosting, try our Naturally Colorful Frosting Mix with Sprinkles.

Sugar Cookies | Gluten-free | Allergen-friendly

Yellow_Frosting_Cookie_Sq_web.jpg

Sweet (but not too) simple and delicious, these sugar cookies are a staple in the dessert department. Decorate with all the colors to make the cookies more bright and fun!

Ingredients

COOKIES
1 cup organic sugar
½ cup butter, room temp
1 large egg
1 tbsp milk (or substitute)
1 ½ tsp vanilla
¼ tsp salt
2 cups Bob's Red Mill Gluten-free 1 - 1 Flour

ICING
1 Color Kitchen Frosting Mix (choose your color) with sprinkles
OR
1 Color Kitchen Plain Frosting Mix with Color of your choice
1 Color Kitchen Nonpareil Sprinkles
3 tbsp milk (or substitute)
1 tsp vanilla

Directions

Mix sugar and butter for 1 minute at medium speed.

Add egg, ,milk, vanilla and salt and blend for another 30 seconds, until combined completely.

Chill for 1 hour or overnight. Cover to keep from drying.

Preheat the oven to 350F.

Lightly flour surface. Roll chilled dough to about ¼-inch thick and cut out shapes with cookie cutters.

Use non-stick baking sheet or cover with parchment paper and place cookies 1 inch apart.

Bake for 10 minutes or until edges start to brown slightly.

Cool cookies completely before decorating with icing.

While cookies are cooling prepare icing according to instructions on package. Once cooled, dip or drizzle icing on cookies and top with colorful sprinkles.

Allow icing to dry for several hours before enjoying.


Baked Cake Mix Donuts | Gluten-free

Cake-Mix-Donuts-1.jpg

MAKES: 12 DONUTS

A delicious, healthier baked donut you can make at home in less than 30 minutes, by the Glutenless Apron! These super fun cake mix donuts are incredibly tasty and super easy to make.

Homemade baked cake mix donuts are a lightened up version of the deep-fried ones you’ll find at the bakery. So simple to make, all you need is a box of your favorite gluten free cake mix and a few pantry staples. You are going to love these baked donuts, they are slightly sweet and perfectly cakey.

These baked cake mix donuts are finished off with a sweet powdered sugar glaze and topped with a few rainbow sprinkles. They are totally irresistible.

INGREDIENTS

(links below are the gluten free/celiac safe products used in this recipe)

DONUTS
⅓ cup melted refined coconut oil
1 large egg
1 cup unsweetened almond milk
1 box Gluten-free Vanilla Cake Mix

FROSTING
1 tbsp melted refined coconut oil
1 ½ cups powdered sugar
2 tbsp unsweetened almond milk
½ tsp pure vanilla extract
½ Color Kitchen Color packet
1 Color Kitchen Rainbow Sprinkles packet

DIRECTIONS

Preheat oven to 350 degrees. Lightly spray a donut pan with nonstick cooking spray. Set aside.

In a medium bowl, whisk together the coconut oil, egg, and almond milk until well combined. Add the cake mix and stir just until combined.

Pour batter into a piping bag or large ziplock bag. Pipe the batter into the donut pan so each cavity is filled ¾ of the way full. Bake for 13-15 minutes or until donuts bounce back when touched. Let cool in the pan for 5 minutes, then transfer to a cooling rack.

Once the donuts have cooled, in a small bowl, whisk together the coconut oil, powdered sugar, almond milk, and vanilla extract. If the glaze is too thick add more almond milk until you get a nice pourable consistency, but not too runny. Stir in food coloring until well blended.

Dip the top of each donut into the glaze and set back on a cooling rack. Add sprinkles while the glaze is still wet.

~Glutenless Apron

Recipe Notes:

Adapted from Somewhat Simple

Paleo Carrot Cake Bars with Natural Robin's Egg Frosting | Gluten-Free | Dairy-Free

carrot_cake.jpg

These easy paleo carrot cake bars are gluten-free, dairy-free and full of flavor!

INGREDIENTS

CARROT CAKE BARS
2 ¾ cups almond flour
¼ cup oat flour, or coconut flour for paleo
⅓ cup unsweetened shredded coconut
2 tsp cinnamon
½ tsp ground ginger
½ tsp nutmeg
⅛ tsp ground cloves
2 tsp baking powder
½ tsp baking soda
¼ tsp sea salt
½ cup coconut sugar
½ cup coconut oil, melted and cooled, or neutral oil like grapeseed oil
1 tsp vanilla extract
5 tbsp maple syrup
2 eggs, room temp
1 cup finely shredded carrot
¼ chopped dates, or raisins
¼ chopped walnuts, or other nuts

ROBIN EGG VANILLA BUTTERCREAM
1 cup powdered confectionary sugar, or unrefined powdered sugar for paleo**
¼ cup non-dairy butter, I use Miyoko's
½ tsp vanilla extract
2-3 tsp non-dairy milk, as needed
1 packet of Color Kitchen Blue Color packet
1 tbsp of melted chocolate chips for speckling

ingredients.jpg

DIRECTIONS

1. Preheat oven to 350F and line an 8”x8” square baking pan with parchment and spray edges with cooking spray. Set aside.

2. In a medium bowl, mix together the almond flour, oat or coconut flour, shredded coconut, cinnamon, ginger, nutmeg, cloves, baking powder, baking soda and sea salt. Combine well until no lumps remain.

3. In a larger mixing bowl, whisk together the coconut sugar, melted and cooled coconut oil, vanilla, maple syrup, and room temperature eggs (this is important so the coconut oil does not coagulate — place them in a bowl of warm water for 3 minutes if they are not room temperature) until well combined and smooth.

4. Add the dry ingredients to the wet and mix until just combined. Now add in the shredded carrots, dates and nuts. Mix again with a spatula or spoon until incorporated.

5. Carefully fold the batter into the prepared baking pan and spread until even. Shake and tap the pan to release air bubbles.

6. Bake 22-28 minutes, edges will brown and top will set. Toothpick will come out clean with just a few crumbs when ready. And the cake will bounce back with a light touch.

7. Place on cooling rack to cool before removing from pan.

8. Prepare the buttercream frosting. Mix together all ingredients except for food coloring in a small bowl with a hand mixer or stand mixer until smooth. Start with 2 tsp of non-dairy milk and add 1 tsp more at a time if too dry. Or add more powdered sugar to thicken. Once desired consistency, add in blue food color powder or natural blue food coloring. Start with just a few drops so it’s a pastel blue.

9. Once the carrot bars have cooled, remove them in one piece by lifting the parchment sides and place back on cooling rack. Generously frost them with the blue frosting.

10. Melt the 1 tbsp of chocolate chips or bar in a microwave safe bowl or over the stove top. They will melt fast so melt in small increments, 15 seconds at a time. Once melted, dip a clean small paintbrush into the chocolate and flick it back with your fingers to create speckled splashes onto the frosting. Depending on the chocolate chips used, they may be too thick to create a splash. If so, add 1 tsp of coconut oil to the chocolate to thin it out. Keep flicking the paintbrush until you reach the desired amount of speckle.

11. Wait for chocolate to set. Then slice into bars and enjoy!

Notes:

·       I have not tried egg subs here but I do think flax eggs will work (2 tbsp ground flax + 6 tbsp warm water) They just may be a little more dense. Aquafaba eggs may work, too.

·       To make your own unrefined powdered sugar, place any granulated sweetener in a high speed blender for 30-60 seconds. I prefer to use coconut sugar because it is my go to low glycemic sweetener but you can use any granulated sugar or monkfruit.

·       You can use any powdered sugar for the frosting, just know if you use a brown sugar like coconut sugar, your frosting won’t bright blue!

~Gutsy Baker, Stephanie Charbonneau

Rainbow Pancake Cereal | Gluten-free

Mini_Pancakes_blog.jpg

It’s the latest breakfast craze, but with a pop of color!

MAKES: 60 MINI PANCAKES-ENOUGH FOR SEVERAL BOWLS OF CEREAL

Making Pancake Cereal is easy with Color Kitchen’s naturally vibrant food colors made from nutrient rich turmeric, spirulina and beet. You can use any pancake mix or our Color Kitchen Gluten-free Rainbow Pancake Mix with colors included.

INGREDIENTS

1 Color Kitchen Gluten-free Rainbow Pancake Mix
1 ½ cup milk (or substitute)
2 tbsp melted butter or oil
2 eggs (or egg substitute)

DIRECTIONS

Blend pancake mix with milk, butter and eggs. Split batter into 4 bowls, approx ¾ cup each. Add 1 color packet to each bowl and blend until all the color has dissolved.

ADDITIONAL COLOR MIXING
For purple mix equal parts pink and blue batter. For or orange mix 2 parts yellow to 1 part pink batter.

Put 1 tbsp colored batter per mini cake on the skillet and cook on low heat. Watch for browning and do not overcook.

Top with milk or maple syrup and enjoy a colorful and delicious breakfast treat!

Italian Rainbow Cookies | Sugar-Free | Gluten-free

ItalianCookiesBlog.jpg

A healthier, allergen-friendly take on the quintessential Italian dessert. Try with any color combination!

INGREDIENTS

ALMOND PASTE (makes approx. 8oz)
1 cup blanched almond flour
½ cup powdered monkfruit sugar
⅛ tsp salt
1 large egg white
½ tsp almond extract

COOKIES
8 oz almond paste
2 ½ sticks butter, cut into pieces + softened
2 cups gluten free 1:1 baking flour
1 cup granulated monkfruit
4 large eggs, room temperature, separate yolks from whites
½ tsp salt
2 tsp vanilla extract
1 tsp almond extract
1 Color Kitchen Pink Food Color packet
1 Color Kitchen Green Color packet

FILLLING
1 jar raspberry jam
10 oz chocolate

ItalianCookies2_sq.jpg

DIRECTIONS

Prepare the Almond Paste: Using a food processor with the blade attachment, add almond flour, powdered sugar + salt and pulse until mixed.

Add in almond extract and egg white and continue pulsing until a dough forms.

Remove the dough from the food processor, roll into a log and wrap in plastic wrap, storing in the fridge until ready to use. The almond paste can be prepared ahead and refrigerated up to 10 days prior to using. This recipe makes approx. 8oz of almond paste; you will use all of it in the cookie batter.

Prepare the Gluten Free Italian Rainbow Cookies: Position oven racks on upper and lower thirds of the oven and preheat to 350F.

Grease and flour 8x8 baking pans or line with parchment paper.

In the bowl of a stand mixer fitted with the paddle attachment, combine almond paste and ¾ cups plus 2 tbsp of monkfruit sweetener. Mix on medium speed until small crumbles form.

Next begin adding softened butter a few pieces at a time, continuing to mix on medium speed until well combined. Next, beat in egg yolks, vanilla, and almond extract until smooth. The batter will be pretty thick which is normal.

In a separate mixing bowl, sift 2 cups of flour and ½ tsp of salt together. Gradually add to batter, mixing on low speed until combined.

In another bowl, beat egg whites until foamy. Using an electric mixer or the whisk attachment on your stand mixer is best rather than doing this by hand. Once egg whites are frothy, beat in additional 2 tbsp of granulated monkfruit + continue to whisk until stiff peaks form.

Gently fold in ⅓ of the egg whites into the batter using a silicone spatula, then gently fold in the remaining egg whites. The batter will feel a little difficult to work with but will become easier and fluffier as you add the egg whites. It will still be slightly dense once the egg whites are fully incorporated.

Next, evenly distribute the batter into 3 separate bowls. Mine weighed approximately 350g each, but you can eyeball this step if you do not have a kitchen scale.

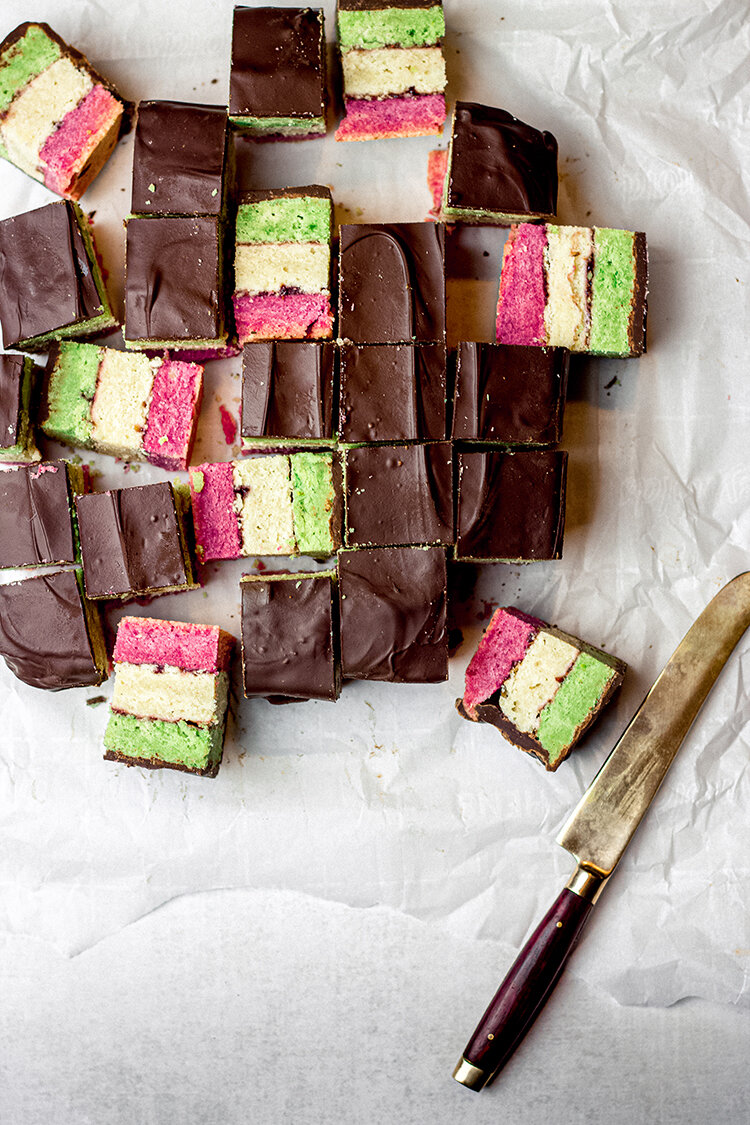
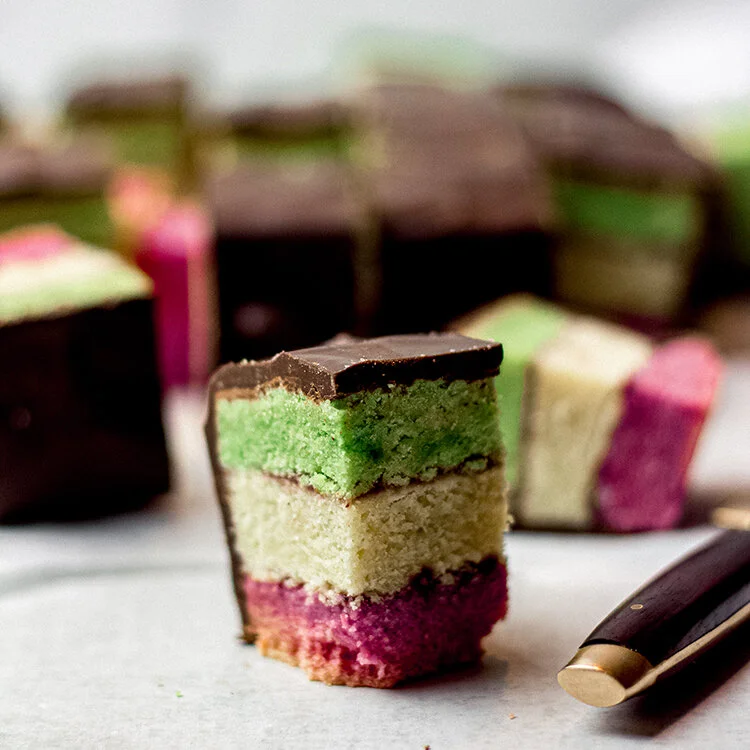
Color the Batter: Add 1 packet of pink coloring to one bowl, 1 packet of green to another, and leave the third bowl plain. Using a silicone spatula or mixing spoon, fold in coloring packets until fully combined.

Bake the Layers: Transfer each of the batters to three separate parchment lined 8x8 baking pans. Dip an offset spatula in water and use it to spread the batter evenly around the pan, ensuring you get it into the corners of the pan. Smooth out the tops.

Bake for 8-10 minutes or until edges are golden brown. Note: if you are using glass pans, baking time will take slightly longer, closer to 12-15 minutes.

When finished, allow cakes to cool completely on wire racks.

Assemble the Layers: Once cool, place the green layer onto a cool cookie sheet or cutting board to use as a base. Gently spread a thin layer of jam on top. Carefully slide the plain layer atop the green and gently spread another thin layer of jam on top. Slide pink layer on top.

Carefully cover the cake with plastic wrap and place a second clean pan on top. Top the pan with heavy objects like cans or bags of flour to weigh down the layers. Refrigerate 4 hours up to overnight.

Add the Chocolate Layer: After cake has chilled, remove plastic wrap and carefully trim any uneven edges. Flip onto a cooling rack so the green layer is now on the top. Place the cooling rack atop a parchment lined cookie sheet to catch any mess.

Melt chocolate in a heat proof bowl resting above a pot of simmering water (this creates a double boiler). Carefully pour over cake. Dip an offset spatula into the simmering water and use it to evenly spread the chocolate over top of and alongside the cake.

Cut the Italian Rainbow Cookies: Using a sharp knife, cut the cookies into 25 pieces. If you want clean edges, dip your knife in hot water and clean with a towel in between cuts.

Store in an airtight container up to 1 week at room temperature.

~ A Pretty Delicious Life


red velvet cake truffles | gluten-free | natural

These poppable, delectable Love Day treats are the perfect dessert after a romantic meal.

MAKES: 16-20 CAKE TRUFFLES
Prep Time: 40 minutes
Cook Time: 30 minutes

Ingredients

1 Color Kitchen Red Velvet Cake Mix
2 eggs, at room temperature
1 cup buttermilk or yogurt
½ cup warm water
1 stick butter, softened
1 tsp vanilla
12 oz white chocolate candy melts
16-20 straws or lollipop sticks
1 styrofoam board

Directions

Preheat the oven to 325°F. Oil two 8-inch cake pans.

In a medium sized bowl, add cake mix, buttermilk, water and vanilla and mix with a hand or stand mixer for 1 minute on low speed. Add eggs and mix on low for another 30 seconds, scraping down the sides of the bowl with a spatula. Add warm butter and mix for 1 minute on medium speed, until completely blended.

Divide batter evenly between the two pans. Place pans on the middle rack of the oven. Bake for 25-30 minutes, until a toothpick inserted in the center comes out clean. Cool for 10 minutes

Empty the cake pans into a large bowl.  Use a fork or your hands to break up the cake and mash it into a dough.  Form the dough into 16-20 smooth 2 tablespoon- sized balls.  Place the balls in the fridge for 10 minutes

Place the white chocolate melts in a microwave-safe cup or bowl.  Microwave in 30-second increments, mixing after each increment, until completely melted.

Insert a straw or lollipop stick into one of the cake balls.  Dip the ball into the melted white chocolate to coat.  Push the cake pop stick into a styrofoam block to dry in an upright position.

Repeat with all of the cake balls.  Allow the balls to dry for at least 1 hour.  

Cream Cheese Mints | Gluten-free | Natural

CreamCheeseMints_0047.jpg

Feel like a fancy baker with these colorful creations. Practice your piping and your color combos, and see what you can come up with!

MAKES: 10 DOZEN

INGREDIENTS

8 oz. organic cream cheese (one package)
2 tbsp (28 g.) organic salted butter
1 tsp organic coconut oil
850 g. (6 cups) organic powdered sugar, sifted
1 tbsp organic peppermint flavor (or if you’re using extract only 1 ½ tsp)
2-3 Color Kitchen Color packets (yellow, pink, blue shown here)
water

DIRECTIONS

In the bowl of your stand mixer fitted with the paddle attachment, add the cream cheese, butter and coconut oil. Mix on low until combined then speed mixer up to high and whip for 1-2 minutes. 

Turn the speed down to medium and slowly incorporate all the powdered sugar. Once completely incorporated, scrape down the sides of the mixing bowl and add the vanilla extract and peppermint flavor. Then turn speed up to high and whip again for 1-2 minutes.

Separate into three different bowls, each bowl should have about 221 g. each.

In one bowl add ½ tsp yellow and just a drop of water on top of the yellow to help incorporate. Stir to combine completely.

In the second bowl, add ⅛ tsp pink and ⅛ tsp blue to make lavender and a drop of water. And in the third, add ¼ tsp blue and ¼ tsp yellow to make mint and a drop of water. Stir both so they are completely combined.

Put each color in a piping bag with decorating tip #864.

CreamCheeseMints_0012.jpg

Line two baking sheets with parchment paper. Pipe little dollops onto a baking sheet with parchment paper.

Place in the fridge until set, about 6 hours or overnight.

Store in the fridge.


Rainbow Colored Pancakes | Gluten-free | Natural

Who doesn’t love rainbows? Who doesn’t love pancakes? Okay, so, rainbow pancakes it is!

MAKES: 12-16 PANCAKES

RainbowPancakes_Mix_Kitchen.jpg

INGREDIENTS

Color Kitchen Gluten-free Rainbow Pancake Mix
1 ½ cup milk (or substitute)
2 tbsp melted butter or oil
2 eggs (or egg substitute)

DIRECTIONS

Blend pancake mix with milk, butter and eggs. Split batter into 4 bowls, approx ¾ cup each. Add 1 color packet to each bowl and blend until all the color has dissolved.

For more colors you can mix the colored batter.

COLOR MIXING
Purple mix equal parts pink and blue batter
Orange mix 2 parts yellow to 1 part pink batter

Cook on low heat so pancakes do not get too brown. Top with your favorites: fruits, syrup or nuts.


Red Velvet Pancakes | Gluten-free

RedVelvet_Pancakes_web.jpg

Enjoy a decadent breakfast with red velvety pancakes! Our Gluten-free Red Velvet Cake Mix can be easily modified to create a delicious red velvet breakfast. Or add our natural Red Velvet Color to any favorite pancake mix.

MAKES: 12-16 PANCAKES

Red_Velvet_Pancake_web.jpg

INGREDIENTS

1 Color Kitchen Gluten-free Red Velvet Cake Mix
2 eggs
3 tbsp oil
1 ⅓ cup kefir or buttermilk

DIRECTIONS

In a large bowl mix 1 box cake mix, eggs, oil and kefir together until combined and smooth.

Heat griddle on low and add oil to prevent sticking.

Scoop ¼ cup batter into pan and cook on low heat. Once bubbles form, flip and cook on second side for a 1-2 minutes. Avoid browning.

Top with raspberries or strawberries, fresh whipped creme and a raspberry syrup.

So delish!

NATURALLY COLORFUL UNICORN NOODLES | Gluten-free

unicorn_noodles_med.jpg

Heard about Unicorn Pasta? Try this fun and easy recipe to color your noodles with a rainbow of unicorn combinations! Our colors are plant-based, non-GMO and artificial dye-free for a naturally beautiful and nourishing bowl of fun!

purple_pasta_unicorn_noodles.jpg

INGREDIENTS

1-2 bags Lotus Foods Organic Rice Pad Thai Rice Noodles
2 Color Kitchen Color packets (pink + blue)
2 tsp lemon juice
1 tbsp coconut nectar, or agave
1 Color Kitchen Rainbow Sprinkles packet (optional)
Colorful fruits, veggies and nuts of your choosing

DIRECTIONS

Cook and rinse pasta. Strain and let cool.

Put ½ packet pink color into a medium sized bowl. Put other ½ of pink and 1 blue packet (for purple) into another medium sized bowl. Or, another option is to add colors to ziplock baggies to toss with noodles.

Put 1 part pasta in with pink color and other half with pink and blue color combination. Stir with mixing spoon in bowls, or gently toss in ziplock baggies. Add a little water if needed to dissolve and blend color. Once noodles are saturated with color, strain again to remove excess water if needed.

Toss with coconut nectar and lemon juice to taste.

Plate pasta and be creative! Add colorful fruits, vegetables, and more to enjoy a gorgeous bowl of healthy fun!

Easter Cake | Natural | Artificial Dye-free

EasterCake_0111.jpg

We absolutely love the Simple Mills and Color Kitchen collab — especially for something as cute as this!

Makes: 3 Layer 6” Cake (or 2 Layer 8” Cake)

Ingredients

2 boxes Simple Mills Vanilla Cake Mix
3 Jars Simple Mills Vanilla Frosting
1 Blue Color Kitchen Color packet
1 Green Color Kitchen Color packet
1 Orange Color Kitchen Color packet
1 Color Kitchen Rainbow Sprinkles

Directions

Follow the directions on the back of the box to bake the cake mix and pour into either 3 6” cake pans or 2 8” cake pans.

Once the cake is cooled, remove from pans.

In a mixing bowl, or in your stand mixer fitted with the paddle attachment, add 2 jars of frosting and 1 packet of ColorKitchen Blue and mix to combine completely.

On a cake stand, plate or spinner, add a small dollop of frosting and place the first cake layer. Add a generous amount of frosting and spread to cover the layer evenly. Top with the second cake layer, and repeat this process. Frost the rest of the cake with the blue frosting.

EasterCake_0068.jpg

Divide the last jar of frosting into two bowls. In the first add ColorKitchen Orange packet and stir to combine completely. In the second, add the ColorKitchen Green packet and stir to combine completely.

In a piping bag with decorating tip #133, add the green frosting. You will use this for the grass and for the carrot tops. Set aside.

In a piping bag with a coupler, add the orange frosting and decorating tip #104. This will be used for the carrots.

First, pipe grass all the way around the boarder of the cake.

Next, with the larger side of tip #104 up against the cake and the smaller side closer to you, pipe a line going back and forth to create a carrot shape. Do this around the entire cake, or anywhere that you want carrots. You can make them varying sizes and heights, have fun with it

Using the green frosting, pipe little dollops on the tops of all carrots to create the tops.

Switch out the decorating tip #104 for #96 in the orange and pipe a boarder around the top of the cake.

Sprinkle the top with ColorKitchen Rainbow Sprinkles.

Italian Cream Cake | Gluten-free | Dairy-free

Snowflake Cake_blog.jpg

INGREDIENTS

CAKE
½ cup organic palm shortening
½ cup non-dairy, cultured coconut oil butter 
2 cups organic unbleached cane sugar 
3 eggs, at room temperature
3 eggs divided into yolks and whites
2 tbsp agave nectar 
1 ¼ cup almond or coconut milk blend
2 tsp vanilla extract
½ tsp almond extract
3 cups finely ground almond flour
1 cup Edward & Sons coconut flour
1 tbsp baking powder
½ tsp sea salt
1 cup chopped, toasted pecans
½ cup Edward & Sons lightly sweetened shredded coconut    

OPTION 1 (advanced)

FLAX MERINGUE BUTTERCREAM
½ cup flax egg whites (see below)*
1 cup organic unbleached sugar
½-1 cup organic powdered sugar (to taste)
2 tsp vanilla extract
1 tbsp agave nectar (optional)
1 cup organic palm shortening 
½ cup cultured, coconut oil butter 
2 tbsp of non-dairy cultured, cream cheese (optional) 
1 Blue Color Kitchen Color Packet
½ cup Edward & Sons shredded sweetened coconut (for the garnish) 

*REDUCED FLAX EGG WHITES RECIPE
4 cups of water
1½ cup of whole flax seeds (not ground)
INSTRUCTIONS: In a quart saucepan, simmer the flax seeds until reduced to 1 cup of water. Strain seeds and keep in the fridge up to 10 days or keep in the freezer! 
OPTION 2 (easy)

COCONUT CREAM FROSTING
3 cans of Edward and Sons coconut cream chilled overnight
1 packet of gelatin 
1 Blue Color Kitchen Color Packet
1 tsp vanilla 
1-2 cups of powdered sugar

DIRECTIONS

Preheat oven to 350 degrees F. Grease 4, 6” pans (OR) two 9 inch round pans and line the bottom with parchment paper.

Toast pecans while preparing ingredients, approximately 8-10 minutes. (This step will bring out the flavor of the pecans and keep them from being so soggy in the cake. It’s so worth it!) 

In a large bowl, cream the palm shortening and butter, sugar, 3 eggs, 3 egg yolks,  vanilla and almond extract together until creamy

In a large separate bowl, sift the almond flour, coconut flour, baking powder and salt together.

In a clean bowl, (wipe any traces of grease clean with lemon juice or vinegar) whip together the 3 remaining egg whites until stiff peaks form. 

Add the dry ingredients to the wet ingredients, pour in the milk and fold the batter gently by hand until combined.  Then fold in the egg whites, toasted pecans and coconut until combined. Do not over mix!

Divide batter evenly between pans and spread out with a spatula to smooth the tops. Bake for 35-40 minutes or until cake is golden brown, no longer jiggly in the middle and a tester comes out clean.

Let the cake cool before removing from the pan and refrigerate the cake before frosting.

DAIRY-FREE, FLAX SWISS MERINGUE BUTTERCREAM
While the cake is baking, heat together flax egg white and sugar in a small saucepan until sugar has dissolved and add the agave nectar to keep it from crystallizing. Cool this syrup until you are ready to frost the cake. (I usually prep this ahead of time and store in the fridge, then warm it up to room temperature when needed.)   Note: it is very important the syrup is not warm or cold to the touch, or it will not incorporate into the butter correctly and may create a curdled mess of fat and syrup. If this happens just leave it out longer to warm up or place the bowl in warm water for a few minutes to speed up the process. All of your ingredients must be room temperature!

In mixing bowl, beat the organic palm shortening, butter, cream cheese and vanilla until creamy and smooth and slowly add the flax syrup. Continue beating for several minutes until mixture is fluffy and smooth. Add a the powdered sugar and continue to whip for a few more minutes until you reach the consistency of whipped cream. If the mixture doesn’t come together but looks too soft, add a little more butter or shortening by the tablespoon until it fluffs back up to firm peaks. 

Dissolve the powdered food colors in the flax syrup or in the vanilla extract before adding to the “buttercream”

Fill and frost your cake! 

Garnish with coconut and serve! (I pulsed the coconut in the processor a few times until it resembled snowflakes) 

Cake should be kept covered in the fridge for optimal freshness and will stay good for 4-5 days

COCONUT WHIPPED CREAM FROSTING
In a microwave-safe, glass bowl (or saucepan on a stove top) dissolve gelatin in one can coconut cream for 2 minutes over medium heat. 

Let cool before adding the packet of color and vanilla.

Whip together chilled coconut cream and slowly add the cooled gelatin mixture and powdered sugar, whipping until stiff peaks form. This may take 3-4 minutes. If the cream doesn't whip up firm enough,  Let the mixture set in the fridge for an hour if needed and then whip again.  You can leave out the gelatin step 1-2, but this will stabilize the whipped cream and keep it from going flat so quickly when you spread it over the cake.

 Fill and frost on a chilled cake and serve!

Snowflake _ingredients.jpg

Red Velvet Skillet Cookie Sundaes - Artificial Dye-free | Gluten-free

Baked in cast iron skillets, these gluten-free red velvet cookie pies are served warm, melting with white chocolate, caramel, and ice cream yumminess. A perfect holiday dessert for those cold nights, to be shared with those you love.

MAKES: 3 COOKIE PIES
Prep Time: 10 minutes
Cook Time: 30 minutes

INGREDIENTS

COOKIES
1 bag Color Kitchen Red Velvet Cookie Mix
1 egg (room temp)
1 tbsp buttermilk (or yogurt)
1 stick butter (softened), plus some for greasing the skillets
1 tsp vanilla
½ cup white chocolate chips

CARAMEL SAUCE
1 cup granulated sugar
1 stick butter
½ cup heavy whipping cream

TOP WITH
3 scoops vanilla ice cream

DIRECTIONS

Preheat the oven to 325 degrees and grease 3 mini cast iron skillets with butter.

Prepare the red velvet cookie dough according to the instructions on the package (vegan option available).  Fold in the white chocolate chips.

Divide the cookie dough evenly between the 3 skillets and press it into the bottom of the skillets.  Place the skillets in the refrigerator to chill for 15 minutes.

When the dough is done chilling, transfer the skillets to the oven and bake for 16 minutes.

While the skillet cookies are baking, prepare the caramel sauce. Heat sugar in a small skillet over medium heat, stirring constantly until it is totally melted.  The sugar will form clumps before beginning to melt.  Once the sugar melts, add the butter and stir until it is melted.  The mixture will sizzle up when the butter is added.  Don’t be alarmed, this is normal.  When the butter is melted, add the heavy cream (the mixture will sizzle up again) and stir until all of the ingredients are evenly combined.  Let the caramel simmer for 2 minutes, then remove from heat and let cool.

When the cookies are finished baking, let them cool for at least 10 minutes.

Once the cookies are finished cooling, top each one with a scoop of vanilla ice cream and drizzle with caramel sauce.

Red Velvet Cookies with White Chocolate and Sea Salt | Gluten-free | Natural

Color Kitchen Red Velvet Cookies 4-web.jpg

Using our naturally colorful Red Velvet Gluten-free Cookie Mix, simply add some white chocolate and top with sea salt, These delicious cookies are soft and fudgy in the middle.

MAKES: 24 COOKIES

Color Kitchen Red Velvet Cookies 2-web.jpg

INGREDIENTS

1 Color Kitchen Gluten-free Red Velvet Cookie Mix
1 large egg
2 tbsp buttermilk (or yogurt)
1 stick butter (softened)
1 tsp vanilla
white chocolate chunks
coarse sea salt

VEGAN SUBSTITUTIONS: Replace egg with 3 tbsp aquafaba, buttermilk with 2 tbsp vegan yogurt, butter with ½ cup vegan butter and vegan white chocolate.

DIRECTIONS

Preheat oven to 325 degrees.

In medium sized bowl add cookie mix, egg, buttermilk and vanilla and mix with a hand or stand mixer for 1 minute on low speed. Add butter and mix on low for another 30 seconds, scraping down the sides of the bowl with a spatula until completely blended. Add white chocolate and lightly fold in. Save some chocolate bits to put on top after baking, in case the baked chocolate gets a little colored when baking.

Scoop dough into rounded tablespoons and place on cookie sheet 2 inches apart. Sprinkle cookies with sea salt.

Bake for 12 minutes. Remove from oven and add extra white chocolate on top if needed.

Enjoy with a tall glass of milk!