Shamrock Shake & Maraschino Cherries | Natural | Artificial Dye-free

Shamrock Shake Natural Green Color

Natural St. Patrick's Day shake recipe with homemade maraschino cherries - free from artificial dyes and ingredients!

MAKES: 1 MILKSHAKE
Prep Time: 10 minutes

Ingredients

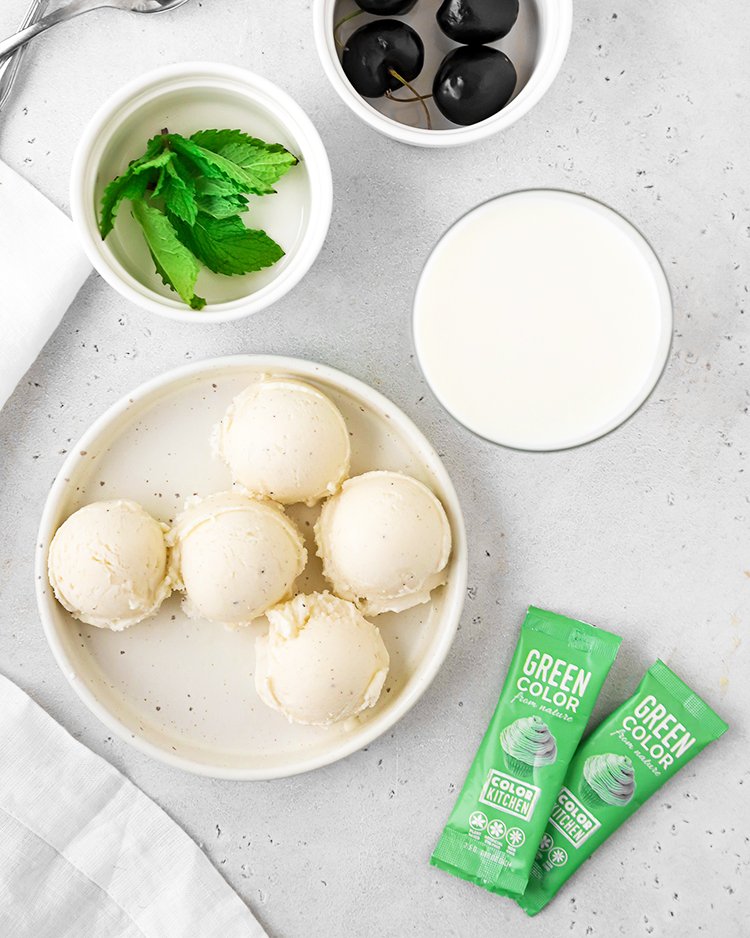
1 cup vanilla ice cream (or vegan ice cream)
½ cup whole milk (or milk alternative)
¼ tsp peppermint extract
1 Color Kitchen Green Color Packet (you can use 2 packets for a deeper color)
Optional toppings: whipped cream, fresh or maraschino cherries

Shamrock Shake Natural Green Color

Directions

Add the ice cream, milk, peppermint extract, and color packet to a blender and blend until combined.

Pour into a glass and top with the toppings of your choice! 

make your own maraschino cherries

Prep Time: 10 minutes
Cook Time: 10 minutes 

Ingredients

1 cup fresh cherries, pitted
½ cup water
½ cup sugar
1 ½ tsp lemon juice
½ tsp vanilla extract
¼ tsp almond extract

Directions

 In a small saucepan over medium heat, combine the sugar and water.  Stir over heat until the sugar has melted.  Remove from heat and stir in the lemon juice, vanilla extract, and almond extract.

Place the cherries in a sealable jar.  Pour the syrup on top.  Seal the jar and place it in the fridge.  Let the cherries sit in the fridge for 2-3 days before using.

natural shamrock color

Striped Easter Eggs | Natural Dyes | Plant Colors

Natural Easter Egg Dyes

MAKES: 12-24 EGGS
Prep Time: 20 minutes

Ingredients

Color Kitchen Easter Egg Coloring Kit
12-24 eggs
2 tbsp white vinegar
masking tape

Natural Easter Egg Dyes

Directions

Place eggs in a single layer in a large saucepan. Add enough cold water to cover the eggs.  Bring to a boil on high heat. Let the eggs boil for 1 minute, then remove them from heat. Let the eggs stand in the hot water for 12 minutes, then transfer them to an ice bath to cool.

Dry the eggs completely with a towel. 

Cut the masking tape into thin strips.  Arrange the tape on the eggs to create stripes.  Make sure that the tape is pressed down firmly on the eggs.

Empty each color packet into a separate cup. Add ¼ tsp water and blend thoroughly with the brush to dissolve the powder. Leave for a couple of minutes then blend again. Keep mixing until all of the powder has dissolved. Add 1 tbsp white vinegar to the pink/purple dye and the blue dye only (not yellow/orange). Add 2 tbsp water to all and mix.

Put the eggs in the cups and turn them over gently with a spoon to cover all sides. Dip quickly for pastel colors. Leave for several minutes for deeper shades. Take the eggs out with a spoon and set in the tray or empty egg carton to dry.

Remove the masking tape.

Get Your Natural Egg Dye Kit

New Year’s Eve Champagne Yogurt Cupcakes with Sparklers | Natural

New Year’s Eve Champagne Yogurt Cupcakes with Sparklers

Champagne Cupcakes made with Greek Yogurt – sparkling with naturally colored frosting and sprinkles for your New Year celebration!

MAKES: 12 CUPCAKES
Prep Time: 35 minutes
Cook Time: 20 minutes

Ingredients 

CUPCAKES
1 ¾ cups all purpose flour
½ tsp baking soda
½ tsp baking powder
½ tsp salt
½ cup unsalted butter, softened
1 cup granulated sugar
2 large eggs
1 tsp vanilla
½ cup Greek yogurt, room temperature
½ cup Champagne

FROSTING
Color Kitchen Plain Frosting Mix
Color Kitchen Blue, Pink & Green Color Packets
Color Kitchen Nonpareils
OR Color Kitchen Frosting Mixes with Sprinkles (colors of your choosing)
½ cup butter, softened
1 ½ tbsp milk
1 tsp vanilla

DECORATION
12 small sparklers

Try Our Natural Frosting Mixes
Cupcakes

Directions

CUPCAKES
Preheat the oven to 350 degrees and line a cupcake tin with cupcake liners.

In a large bowl, whisk together the flour, baking powder, baking soda, and salt until combined.

In a separate large bowl, cream together the butter and sugar for 2-3 minutes, until light and fluffy.  Add the eggs and vanilla and beat until combined.  Add the sour cream and beat until incorporated.

Add the dry ingredients to the wet ingredients and beat together until you have a thick batter.  Add the champagne to the batter and beat on low speed until all ingredients are combined in a smooth batter.

Scoop the batter into the cupcake liners, filling each liner about ⅔ of the way.  Bake for 20 minutes, and allow to cool before frosting.

FROSTING
In a stand mixer with a paddle attachment, beat together the confectioner’s sugar from the frosting mix and the butter until combined. Add the vanilla and milk and continue to beat until you have a smooth frosting.

Divide the frosting between 4 bowls. In the first bowl, add ¼ or ½ teaspoon of pink color (Note:¼ teaspoon will give you a pastel color, ½ teaspoon will give you a more vibrant color). In the second bowl, add ¼ or ½ teaspoon of blue color. In the third bowl, add ¼ or ½ teaspoon of green color. In the third bowl, add ¼ teaspoon of pink color and ¼ of teaspoon of blue color (this will make purple). Stir the color into the frostings until you have an even color.

Pipe the frosting onto the cupcakes and top with nonpareil sprinkles.Top with small sparklers and light them at midnight for a fun New Year’s Eve celebration!

Christmas Cookie Cake with Rosemary & Cranberries | Artificial Dye-free | Natural Ingredients

Christmas Cookie Cake with Rosemary & Cranberries

Who needs to decide between cookies & cake, when you can have both! Use your decorated Christmas cookies to embellish this festive holiday cake made from all natural ingredients.

MAKES: 16 SERVINGS
Prep Time: 2 hours
Cook Time: 40 minutes

INGREDIENTS

CAKE
1 ½ cup (3 sticks) unsalted butter, softened
3 ⅓ cup granulated sugar
6 large eggs, at room temperature
2 tsp vanilla extract
2 cups whole milk
5 cups all-purpose flour
4 ½ tsp baking powder
1 tsp salt
2 cups whole milk

BUTTERCREAM FROSTING
2 packs Color Kitchen Plain Frosting Mix
1 cup butter (or substitute)
3 tbsp milk (or substitute)
2 tsp vanilla

COOKIES
½ cup unsalted butter, softened
½ cup granulated sugar
1 tsp vanilla extract
1 large egg, at room temperature
1 ¼ cups all-purpose flour
¼ tsp baking powder
¼ tsp salt

ICING
1 bag Color Kitchen Holiday Icing Mix
3 tbsp milk
½ tsp vanilla
A couple drops coconut oil to prevent cracking (optional)

Holiday Icing Mix

DIRECTIONS

CAKE LAYERS

Preheat the oven to 350 degrees and grease 4 8-inch round pans.  Note: if you only have 2 8-inch pans, half the recipe and make it in 2 batches.

In a large bowl with a hand mixer, beat together the butter and sugar on medium speed for 3 minutes.  Add the eggs and vanilla to the butter mixture and beat until combined.

In a separate bowl, whisk together the flour, baking powder, and salt.

Add half of the flour mixture to the wet ingredient mixture and beat until combined.  Add the milk and beat again until combined.  Add the remaining flour and beat until you have a smooth batter.

Divide the batter evenly among the 4 pans and bake for 30 minutes, until a toothpick inserted in the center of the cake comes out clean.

Allow the cakes to cool in the pans for 10 minutes, then invert onto a cooling rack.

BUTTERCREAM

In a stand mixer with a beater attachment, beat the butter and vanilla on medium speed until smooth and creamy.

Add the powdered sugar, one cup at a time, beating on low speed between each addition until smooth.

Slowly add the milk and continue to beat on low speed until incorporated.

Christmas Cookie Cake with Rosemary & Cranberries

COOKIES

In a stand mixer with a beater attachment, beat together the butter and sugar on high speed for 3-4 minutes 

Add the eggs and vanilla to the butter mixture and beat on low speed until combined.

Add the flour, salt, and baking powder and beat until all ingredients are combined in a smooth dough.

Form the dough into a disk and wrap with plastic wrap.  Place in the fridge to cool for 1-2 hours.

Preheat the oven to 350 degrees and line a baking sheet with parchment paper.

When the dough is done chilling, roll it out into a ½-inch thick sheet.  Cut out cookie shapes using cookie cutters of your choice.

Place the cookies on the baking sheet and bake for 10 minutes.  Let cool for at least 15 minutes before decorating with icing.

ICING

Prepare the icing according to the instructions on the package.  Optional: add a couple drops of coconut oil to prevent cracking.

Divide the icing between 2-4 bowls, and mix in color packets of your choice.

CAKE ASSEMBLY

Decorate the cookies with the icing as desired and set aside for at least 1 hour to let the icing harden.

Assemble the cake.  Place one cake layer on a plate or cake stand.  Add a layer of frosting on top, then stack the second cake layer on top.  Repeat with all of the cake layers, then frost the outside of the cake.

Place a teaspoon dollop of buttercream on the back of each cookie, then stick the cookies onto the cake.

Optional: decorate the top of the cake with rosemary sprigs and cranberries.

Red Velvet Lattice Pie Crust - Cranberry Blood Orange Pie | Natural | Dye-free

Cranberry Blood Orange Pie

A creative spin on a classic dish — who doesn’t love a homemade pie? Decorative, delightful and free of dye, this dessert checks all the boxes!

MAKES: 10 SERVINGS
Prep Time: 35 minutes
Chill Time: 2 hours
Cook Time: 50 minutes

Ingredients

PLAIN PIE CRUST
2 ½ cup all-purpose flour
1 cup (2 sticks) unsalted butter, cold
1 tbsp granulated sugar
1 tsp salt
4-8 tbsp water

RED PIE CRUST
1 ¼ cup all-purpose flour
1 Color Kitchen Red Velvet Color Packet
½ cup (1 stick) unsalted butter, cold
1 ½ tsp granulated sugar
½ tsp salt
2-4 tbsp ice water
1 egg for egg wash

FILLING
3 cups fresh cranberries
¼ cup granulated sugar
2 tsp blood orange zest
juice of ½ a blood orange
2 tbsp flour
¼ tsp salt

Red Velvet color packet
Orange Pie

Directions

Prepare the plain crust.  In a large bowl, whisk together the flour, sugar, and salt.  Using a pastry cutter or 2 forks, cut the butter into the flour mixture to create a coarse meal.  Add the water one tablespoon at a time and mix after each addition, until the dough forms large clumps and can be shaped into a ball.  Divide the dough in half.  Form each half into a disk, wrap with plastic wrap, and place in the refrigerator for at least 2 hours, up to overnight.

Prepare the red crust.  In a large bowl, whisk together the flour, sugar, red velvet color packet and salt.  Using a pastry cutter or 2 forks, cut the butter into the flour mixture to create a coarse meal.  Add the water one tablespoon at a time and mix after each addition, until the dough forms large clumps and can be shaped into a ball.  Form the dough into a disk shape, wrap with plastic wrap, and place in the refrigerator for at least 2 hours, up to overnight.

Prepare the filling.  Add all of the filling ingredients to a large bowl and toss until evenly distributed.

Preheat the oven to 450 degrees.

Roll out one disk of plain dough into a 10-inch circle.  Transfer it to a 9-inch pie plate and trim the edges.  Add the filling.

Roll out the red pie dough into a rectangle, about ⅛-inch thick.  Cut it into strips.  Arrange the strips over the pie.

Roll out the remaining plain pie dough into a rectangle, about ⅛-inch thick.  Cut it into strips.  Weave the plain dough strips with the red dough strips to create a lattice topping.

Beat the egg with 1 tablespoon of water.  Brush it over the top of the pie.

Bake the pie for 10 minutes at 450 degrees, then lower the oven temperature to 350 degrees and bake for an additional 40 minutes.  If the crust is becoming too brown, place a sheet of aluminum foil over the top of the pie. 

Let the pie cool for at least 15 minutes and serve with vanilla ice cream.


Chocolate Orange Shortbread Cookies | Natural

Color Kitchen Orange Cookies

These chocolatey cookies are a zesty Fall treat! This recipe can also be made with our other natural colors for any time of the year.

MAKES: 30 cookies
Prep Time: 20 minutes
Chill Time: 2 hours
Cook Time: 12 minutes

Chocolate Orange Shortbread Cookies

Ingredients

¾ cup unsalted butter, softened
⅔ cup light brown sugar
1 large egg
1 tsp vanilla extract
2 tbsp orange zest
1 tbsp orange juice
1 cup all-purpose flour
2 Color Kitchen Orange Color Packets
¼ tsp salt
6 oz chopped dark or semi-sweet chocolate
Optional: flaky sea salt, to sprinkle on top

Directions

Using a hand mixer or a stand mixer with a paddle attachment, beat the butter and sugar together on medium-high speed until light and fluffy.

Add the egg, vanilla, orange juice, and orange zest to the butter mixture and beat on medium-low speed until combined.

In a separate bowl, whisk the flour, salt, and orange color until evenly combined.

Add the dry ingredients to the wet ingredients and beat together on medium speed until just combined in a smooth dough.

Place the cookie dough on a lightly floured surface.  Using floured hands, shape the dough into 2 logs, each about 9 inches long and 2 inches thick.  Wrap the logs in plastic wrap and place in the refrigerator to chill for at least 2 hours, up to 48 hours.

When the dough is finished chilling, preheat the oven to 350° and line a baking sheet with parchment paper.

Remove the logs from the refrigerator and slice each log into 14-15 cookies.  Place the cookies on the baking sheet and bake for 12 minutes.

Let the cookies cool for at least 10 minutes.  While the cookies are cooling, microwave the chocolate in 30 second increments, stirring after each increment, until completely melted.

Dip each cookie in chocolate, or drizzle chocolate over the cookies.  Top with flaky sea salt (optional).

Orange Color Packet

Black Chocolate & Orange Bundt Cake with Greek Yogurt | DYE-free

Black Chocolate & Orange Bundt Cake with Greek Yogurt

This Halloween or Thanksgiving, try our super rich and moist black chocolate cake recipe, made with Greek yogurt and natural ingredients. Topped with an artificial dye-free bright orange icing made easy with our Icing (frosting) Mixes.

MAKES: 1 BUNDT CAKE
Prep time: 15 minutes
Cook time: 45 minutes

Black Chocolate & Orange Bundt Cake with Greek Yogurt

INGREDIENTS

CAKE
1 cup (2 sticks) unsalted butter (plus some for greasing the pan)
1 cup whole milk
⅓ cup black Dutch-process cocoa powder
2 cups all-purpose flour
1 ¾ cup granulated sugar
1 ½ tsp baking powder
½ tsp salt
2 eggs
½ cup plain Greek yogurt

ICING
1 Color Kitchen Plain Icing (Frosting) Mix
3 tbsp milk or milk alternative
1 Color Kitchen Orange Color Packet
½ tsp natural orange extract

DIRECTIONS

Preheat the oven to 350 degrees and grease a 10-cup bundt pan.

In a small saucepan over medium heat, combine the butter, milk and cocoa powder. Mix over heat until the butter is melted and the cocoa powder has dissolved into the milk. Remove from heat.

Combine the dry ingredients. In a large bowl, whisk together the flour, sugar, baking soda and salt.

Add the butter and cocoa powder mixture to the dry ingredients and whisk to create a thick batter. Then add the eggs to the batter and whisk until smooth. Add the Greek yogurt to the batter and whisk one more time until all ingredients are evenly combined.

Pour the batter into the prepared bundt pan. Bake for 45-50 minutes, until a toothpick inserted in the center comes out clean. Allow the cake to cool in the pan for 20 minutes before inverting it onto a cooling rack.

While the bundt cake is cooling, prepare the orange icing. Add the frosting mix, milk, and orange extract to a large bowl and mix until smooth.

Once the cake is cooled, pour the icing on top.

SHOP OUR FROSTING & ICING MIXES

Vampire Cocktail | Natural Red | Dye-free

Vampire Cocktail

This vampire cocktail will make your blood run cold. Serve on Halloween as a cocktail or mocktail. And while the deep red color is dye-free, this drink is sure to spook your guests with sanguine sweetness!

MAKES: SYRUP FOR DOZENS OF DRINKS

INGREDIENTS

BLOOD SYRUP
½ cup agave syrup
1 Color Kitchen Red Velvet Color Packet

SUGAR RIM
¼ cup granulated sugar
1 tsp activated charcoal
1 wedge lime

COCKTAIL (INDIVIDUAL)
2 ounces vodka or tequila
2 ounces grapefruit juice
½ ounce lime juice
½ ounce blood syrup
2 ounces sparkling water
Ice

MOCKTAIL
To make alcohol-free and kid-friendly, replace the liquor with an extra ounce of sparkling water!

Vampire Cocktail

DIRECTIONS

BLOOD SYRUP
Combine the agave and red velvet color packet in a bowl and mix with a fork or spoon until evenly combined.

SUGAR RIM
In a small bowl, mix together the sugar and activated charcoal until evenly distributed. Rub a lime wedge along the rim of your glass, then dip it in the sugar mixture.

COCKTAIL
Fill a glass with ice, then pour in the liquor, grapefruit juice, lime juice, and sparkling water. Mix to combine.

Pour in the blood syrup. Stir lightly to keep the “blood” separated when serving. Stir to combine before drinking.

Get Your Dye-free Red

Lemon Cream Cheese Frosting with Natural Turmeric Color

Lemon Cream Cheese Frosting with Natural Turmeric Color

This lemony cream cheese frosting is perfect for a lemon or vanilla cake, or cupcakes. It’s light and tangy, with just the right amount of sweet, and colored naturally by our turmeric yellow.

MAKES: 1 PINT FROSTING

INGREDIENTS

8 ounces cream cheese, room temp
½ stick butter, room temp
Color Kitchen Plain Frosting Mix
Natural nonpareil sprinkles
1 ½ tsp natural lemon extract
½ tsp vanilla extract
a pinch of salt

DIRECTIONS

In a medium sized bowl, add cream cheese and butter and beat until creamy. Add lemon extract, vanilla and salt and blend.

In another bowl mix dry ingredients: powdered sugar and yellow color from Frosting Mix. Set aside sprinkles.

On low, slowly add dry ingredients until completely blended. Chill before frosting cakes or cupcakes.

Top with dye-free sprinkles and garnish with lemon twists (optional).

Natural Frosting Mix

4th of July Cupcakes | Gluten-free

natural frosting

Happy 4th! Celebrate with gluten-free cupcakes topped with naturally colored buttercream.

CUPCAKES

1 ¼ cups all purpose gluten free flour (I used @bobsredmill)
1 ½ tsp baking powder
¼ tsp baking soda
¼ tsp sea salt
2 eggs, room temp
6 tbsp non-dairy butter
½ cup coconut sugar
½ cup non dairy milk
1 ½ tbsp avocado oil, or neutral oil
1 tbsp vanilla extract

BUTTERCREAM

4 cups unrefined powdered sugar or powdered monkfruit
1 cup non-dairy butter
2 tbsp non-dairy milk
1 tsp vanilla extract
¼ cup red, white & blue sprinkles
1 Color Kitchen Blue and Pink Color Packets (add a little Orange to Pink for deeper red color)

4th of July Cupcakes

DIRECTIONS

Preheat oven to 350F and line muffin tin with wrappers.

In a medium bowl, mix together flour, baking powder/soda and salt.

In another large bowl, beat together coconut sugar & non-dairy butter with a hand mixer or stand mixer for 3-5 mins until smooth. Do not skimp on the beating, this is what makes the cupcakes soft and fluffy!!

Now mix in eggs, milk, oil & vanilla and beat until well combined. Mix in dry ingredients and beat again until smooth and creamy, about 2 min.

Scoop batter into lined muffin tin, about 2/3 way up evenly across the 12 liners.

Bake 16-18 mins until tops are brown and bounce back when lightly poked. Let cool on cooling rack until completely cool.

Beat together all buttercream ingredients with a mixer until a smooth frosting forms. Divide up the frosting into 3 bowls and add ½ - full color packet into 2 bowls. Leave one bowl for white. Mix well. Add all 3 frostings into a piping bag, trying not to mix them.

Cut little circles into the cupcakes and remove the cake. Then fill with patriotic sprinkles (or berry jam!) and place the cake piece back on. Pipe frosting over, or frost each color with a butterknife. Store in fridge for up to 5 days in an airtight container.


~Gutsy Baker, Stephanie Charbonneau

Quick & Easy Unicorn Cake or Cupcakes in a Cup

Quick & Easy Unicorn Cake or Cupcakes in a Cup

Using your favorite cake mix and a pint of frosting, make easy mini cakes or cupcakes in just a matter of minutes!

MAKES: 6 MINI CAKES OR LARGE CUPCAKES

INGREDIENTS

cake mix
pint of frosting
2 Color Kitchen Color packets (pink + blue)
1 Color Kitchen Rainbow Sprinkles
small microwavable bowls or coffee cups

CAKE MIX

Add a little under ½ cup cake mix into each cup. Then add 3 tbsp of water to each and stir until fully mixed and there are no lumps.

OPTION: For confetti cakes, add ½ tsp sprinkles to each and stir lightly. Be sure to save some sprinkles to decorate frosting.

Put in microwave 1-2 at a time for 2 minutes, until batter is fully cooked. Let cool 10-15 min. before frosting.

Add toppers and sprinkles.

Unicorn Cupcake

FROSTING

Split a pint of frosting into 2 bowls ¾ cup each.

For light pastel colors: Add ½ tsp color to each bowl of frosting. For deep rich colors: Add 1 tsp color.

Any remaining color can be saved or used for cake batter.

With a spoon or hand mixer, blend each color into frosting.

For purple: Take ¼ cup blue frosting and ¼ cup pink frosting and blend together.

Add multiple colors into piping bags for a color swirl.

Recommended: star tip.

magical rainbow sprinkles

Pumpkin Orange Spice Pop Tarts | Dye-free Glaze

Pumpkin Orange Spice Pop Tarts

Flaky, buttery homemade pop tarts meet the warm, cozy flavors of fall in this irresistible twist on two beloved classics. Each pastry is filled with spiced pumpkin and topped with a vibrant, naturally colored orange glaze that's as beautiful as it is delicious. Whether you're looking for a special breakfast treat or a fun weekend baking project, these pumpkin orange spice pop tarts deliver nostalgic comfort with a gourmet, seasonal upgrade.

MAKES: 8 POP TARTS
Prep time: 25 minutes, Cook time: 25 minutes, Chill time: 1 hour 

INGREDIENTS

DOUGH
2 ½ cups all-purpose flour
1 tsp salt
1 tbsp sugar
1 cup (2 sticks) unsalted butter, cold
4-6 tbsp ice-cold water
1 egg (for egg wash)

FILLING
½ cup pumpkin purée
3 tbsp brown sugar
½ tsp pumpkin spice
1 egg

ICING
1 Color Kitchen Plain Icing (Frosting) Mix
3 tbsp milk or milk alternative
1 Color Kitchen Orange Color Packet
½ tsp natural orange extract (optional)

shop colors

DIRECTIONS

 In a large bowl, whisk together the flour, sugar, and salt. 

Using a pastry cutter or two forks, cut the butter into the flour mixture to create a coarse meal.  Add the water, one tablespoon at a time, and stir with a wooden spoon after each addition until the mixture comes together in a crumbly dough. 

Pumpkin Orange Spice Pop Tarts

Divide the dough in half and form each half into a disk.  Wrap the disks in plastic wrap and chill for at least 1 hour.

While the dough is chilling, prepare the filling.  Combine all filling ingredients in a medium bowl and whisk until evenly combined.

Preheat the oven to 350 degrees and line a baking sheet with parchment paper.

When the dough is done chilling, roll each disk into a large rectangle, about ⅛ inch thick. Cut 8 even rectangles from each dough disk (16 rectangles total).

Place 8 rectangles on the baking sheet. Spoon a dollop of filling on each of the 8 rectangles, then place another rectangle of dough on top.  Crimp the edges with a fork. Use a knife to poke a few holes on top of each pop tart.

Whisk an egg with a tablespoon of water to create an egg wash.  Brush the egg wash over each pop tart.

Bake the pop tarts for 20-25 minutes, until golden brown.

While the pop tarts are cooling, make the icing. Combine powdered sugar and color in a large bowl and blend. Then whisk in the remaining ingredeints until combined.

 Spoon some icing onto each pop tart, and top with sprinkles. Allow icing to dry before enjoying.

Lavender Pistachio Coconut Cream Puffs | Natural | Dye-free

Lavender Pistachio Coconut Cream Puffs

MAKES: 18-22 SERVINGS
Prep time: 30 minutes, Cook time: 32 minutes

INGREDIENTS

CRAQUELIN TOPPING
½ cup (1 stick) unsalted butter, softened
1 cup all-purpose flour
½ cup brown sugar 

CHOUX PASTRY
½ cup whole milk
½ cup water
½ cup (1 stick) unsalted butter
¼ tsp salt
1 tbsp sugar
1 cup all-purpose flour
4 large eggs 

COCONUT CREAM FILLING
1 13.5-oz cans coconut cream, chilled overnight
6 tbsp confectioners’ sugar
½ tsp lavender extract
½ tsp pistachio extract
1 Color Kitchen Green Food Color packet
1 Color Kitchen Pink Food Color packet
1 Color Kitchen Blue Food Color packet

Get our color packets

DIRECTIONS

Make the craquelin topping.  Using a stand mixer or hand mixer, mix the butter, flour, and brown sugar until they come together into a dough. 

Form the dough into a ball, then sandwich it between two sheets of parchment paper.  Roll out the dough to be about ⅛ inch thick, then place it in the freezer while you prepare the pastry.

Make the choux pastry.  Place the water, milk, butter, sugar, and salt in a medium saucepan over medium heat, and bring to a boil.  Once boiling, add the flour to the pot and stir vigorously for two minutes.  The ingredients should come together into a ball of dough.

Transfer the dough to a stand mixer with a paddle attachment and beat for 30 seconds to a minute to cool.  Add the eggs to the dough, one at a time, to create a thick batter.  The batter has the correct consistency when you can lift up the paddle, and the batter drips off in a V-shape.  If the batter is too thick and does not create a V-shape, add one additional egg.

Lavender Pistachio Coconut Cream Puffs

Preheat the oven to 425 degrees and line 2 baking sheets with parchment paper.

Spoon the batter into a piping bag with a large round tip.  Pipe 1 ½ inch rounds onto the baking sheets.  Cut 1 ½ inch rounds from the craquelin topping.  Press a craquelin round onto each piped cream puff.

Bake the cream puffs at 425 degrees for 10 minutes, then turn the oven temperature down to 325 degrees and bake for an additional 22 minutes, until golden brown.  Let cool for at least 15 minutes.

While the cream puffs are cooling, prepare the coconut cream filling.  Open the chilled cans of coconut cream and scoop out the cream from the top of the can. Discard the coconut water that has settled to the bottom of the cans.  Place the cream in the bowl of a stand mixer with a whisk attachment and add the confectioner’s sugar.  Whisk on high speed for 1 minute, until smooth and fluffy. 

 Divide the coconut cream between 2 bowls.  In one bowl, fold the lavender extract, blue color packet, and pink color packet into the cream.  In the other bowl, fold in the pistachio extract and green color packet.

Combine the two coconut creams in a piping bag with a star tip.  Cut each cream puff in half.  Pipe the coconut cream into the bottom half of each cream puff, then sandwich the two halves together.


Red Velvet Whoopie Pies with Cream Cheese Filling | Gluten-free | Natural

Red Velvet Whoopie Pies

Red Velvet Whoopie Pies are fun for any season, especially around the holidays or as a Valentine's treat. This recipe makes it simple with artificial dye-free, plant-based red color.  

MAKES: 12

INGREDIENTS-COOKIES

2 cups 1:1 Bob's Red Mill gluten-free flour
1 tsp baking powder
4 tbsp non-alkalized cocoa powder
1 Color Kitchen Red Velvet Color Packet
¾ cup natural sugar
¼ cup brown sugar
½ cup butter, melted
1 egg
1 tsp vanilla extract
½ cup buttermilk or kefir
½ tsp salt

INGREDIENTS-CREAM CHEESE ICING (FILLING)

1 Color Kitchen Plain Frosting Mix
1 stick butter (room temp)
8 oz cream cheese (room temp)
1 tsp vanilla
a pinch of salt

NATURAL DYE-FREE RED VELVET COLOR


DIRECTIONS-COOKIES

Preheat oven to 325°F.

Using a hand mixer, cream together softened butter and sugars.

Add in the egg, vanilla extract, and buttermilk. Beat on medium/high speed.

In a separate bowl combine the dry ingredients: flour blend, baking powder, cocoa powder, natural red velvet color, and salt.

Slowly add dry ingredients to wet and blend gently, but do not overmix.

Chill the cookie dough for at least an hour before baking or cookies may bake flat.

Bake cookies for 10-13 minutes. Cool on cookie rack before frosting.

DIRECTIONS-ICING (FILLING)

Put cream cheese and butter in mixing bowl and beat until creamy. Add vanilla and salt and blend. On low, slowly add powdered sugar and mix for 1 min, or until completely blended.

Put a scoop of filling between 2 cookies to make pies. Enjoy!


EASY, Colorful Maple Syrup Icing | Natural

Cookies

This simple icing recipe has just a few ingredients and you can make it in minutes.

Colorful Maple Syrup Icing

MAKES: 2 CUPS

INGREDIENTS

3 cups powdered sugar
4 tbsp milk (or substitute)
¼ tsp vanilla
2 tsp maple syrup
1-2 Color Kitchen Color packets

DIRECTIONS

Mix dry ingredients (sugar and color).

Add milk, maple syrup and vanilla and blend until smooth. Add a little more milk if too thick.

Drizzle icing on cookies or dip and allow to dry overnight.

Remaining icing can be kept for 2 weeks in the refrigerator.

SHOP PLANT-BASED COLORS

Christmas Tree Sugar Cookies | Natural | Dye-free

Christmas Tree Sugar Cookies

So precious are these Christmas tree cookies — make a dessert to be remembered by your family and your friends this holiday season!

MAKES: 30 COOKIES

Christmas Tree Sugar Cookies

INGREDIENTS

COOKIES
1 stick (113 g) organic butter, softened
198 g (¾ cup + 2 tbsp) organic sugar
1 tsp organic vanilla extract
2 organic large eggs
255 g (2 cups) organic flour
½ tsp organic cloves
1 ½ tsp baking powder
½ tsp sea salt

ICING
3 sticks (339 g) organic butter, softened
680 g (5 cups) organic powdered sugar, sifted
¼ cup water
4 g (a pinch) organic Dutch cocoa
1 Pink Color Kitchen Color packet
1 Blue Color Kitchen Color packet
1-2 Green Color Kitchen Color packets

EXTRAS
Christmas Tree Cookie Cutter
rolling pin
extra flour for rolling out cookie dough
piping bags
Ateco decorating tips #56, 30, 133, 96, 21, 34
organic fine shredded coconut

Holiday colors here

DIRECTIONS

Preheat oven to 375 degrees.

In the bowl of your stand mixer fitted with paddle attachment, add the butter, sugar and vanilla extract. Mix on low until all ingredients are combined and there’s no butter chunks.

Add the eggs and mix just slightly.

In a separate bowl, add the flour, cloves, baking powder and salt and whisk together.

Add the flour mixture into the butter mixture and mix until a cookie dough forms.
Flour a surface and roll out the cookie dough to ¼” thick.

Cut out Christmas Trees with a Christmas Tree cookie cutter. Place on a baking sheet with parchment paper, space at least 1” apart.

Bake for 10 minutes. Once cooled, start the frosting.

In the bowl of your stand mixer fitted with paddle attachment, add the butter, powdered sugar and water. Mix on low until combined and then speed up to mixer to high for 1 minute or until light and fluffy.

Split the frosting in six bowls. Put 50 g in one bowl and add the Dutch cocoa, stir to combine into a chocolate frosting.

In two bowls, add 222 g of frosting to each bowl. In one of the bowls add ½ tsp Green and in the other add 2 tsp Green. Stir both to combine completely.

In the last three bowls, add 171 g of frosting in each. In one of the bowls, add just a pinch of Blue and stir to combine completely. In another bowl add just a pinch Pink and stir to combine completely. Colors will be very light and pastel. Add more color for deeper shades.

Put the chocolate frosting in a piping bag with decorating tip #56.

Put the light green frosting in a piping bag with decorating tip #30.

Put the dark green frosting in a piping bag with decorating tip #133.

Put the white frosting in a piping bag with decorating tip #96.

Put the blue frosting in a piping bag with decorating tip #21.

Put the pink frosting in a piping bag with decorating tip #34.

Be creative with designs on each tree. Top with sprinkles or fine shredded coconut to make them look snowy!

Store in an airtight container.

Baker’s Note: To make these gluten free, just substitute the organic flour for 270 g organic gluten free flour blend.

Recipe by Dessert'D Organic Bake Shop

Homemade Summertime Popsicles | Paleo-friendly | Dairy-free | Vegan

Homemade Summertime Popsicles

These colorful firecracker popsicles are made with just a few simple ingredients. Enjoy a paleo-friendly and dairy-free treat while cooling off during those hot summer days and holidays!

~Recipe developed by Noelle Tarr, Coconut & Kettlebells.

Red and white popsicles

INGREDIENTS

6 medium strawberries
3 tbsp honey
½ cup + 3 tbsp coconut water
¼ cup blueberries, frozen
¾ cup full-fat coconut milk (canned)
½ Color Kitchen Color packets (blue and pink)

DIRECTIONS

To make the red layer, add the strawberries, 1 tbsp honey, and 3 tbsp coconut water and a ½ pink color packet (for brighter color) to a high-speed blender and blend until smooth. Pour the contents into a separate container and rinse out the blender.

To make the white layer, add 2 tbsp honey, ½ cup coconut water, and the coconut milk to a high-speed blender and blend until smooth. Pour half of the white mixture into a separate container.

To make the blue layer, add the blueberries and ½ a blue color packet (or ½ pink and ½ blue for brighter purple) to the blender with the remaining white mixture. Blend until smooth.

To assemble the popsicles, pour the blue layer into each mold so that it fills ⅓ of the mold. Use a paper towel to clean any drips on the inside of the mold where the next layers will go. Freeze for 45 minutes.

Once frozen, create red and white stripes by pouring the white mixture into each mold so that it fills about 1/6th of mold and freeze for 35-40 minutes. Repeat this process with a red layer and another white layer, freezing each layer separately for about 30 minutes. Pour the last red layer into the mold and insert a popsicle stick into each mold and freeze overnight.

To help release the popsicles, run the molds under warm water for 15 seconds.

Make this with our color packets

ANIMAL CRACKERS WITH MARBLED ICING | GLUTEN-FREE | ALLERGEN-FRIENDLY | VEGAN-FRIENDLY

Animal Crackers

Animal Cracker cookies are a childhood favorite, but not easily found with allergen-friendly or gluten-free options.

Here are a couple brands that make gluten-free and allergen-friendly animal crackers, but you’ll have to decorate them yourself to get those colorful cookies with nonpareil sprinkles: Glutino Animal Crackers (gluten and soy-free) and Kinnikinnick Gluten-free Animal Cookies (gluten-free, dairy-free, nut-free).

ICING

MAKES: About 5 dozen cookies

INGREDIENTS

1 Color Kitchen Frosting Mix (choose your color!) with sprinkles
1 additional Color Kitchen color packet
milk or substitute
vanilla
coconut oil (optional)

DIRECTIONS

Put powdered sugar in medium sized mixing bowl and add 3 tbsp milk and ½ tsp vanilla. Stir with spoon or hand mixer on low. Add 1-2 more tsp milk depending on desired thickness.

Mix until smooth. Pour ⅓ cup icing (each) into 2 small bowls. Set aside remaining icing for white.

Open color packets and add ½ tsp of color to each icing bowl and stir. Add more color to get deeper shades. Stir until all the powder color is dissolved. Keep unused color airtight in packets.

If icing is still too thick, add ½ tsp milk at a time and stir until desired consistency is reached. Add ½ tsp melted coconut oil for sheen.

Dip cookie half way in one color of icing and then in a second color and twist, to get a marbled effect. Or colors can be combined into one larger bowl. If combining, do not mix colors together, but swirl once with a spoon, so when dipping cookies get coated by multiple colors.

While still wet, add a pinch of sprinkles over cookies. Allow to dry overnight.

Decorate with our frosting and sprinkles

Allergen Friendly Chocolate Birthday Cake | Dairy-free | Egg-free | Gluten-free | Low Glycemic | Vegan

Allergen Friendly Chocolate Birthday Cake

If you’re looking for an allergen or vegan-friendly birthday cake without all the sugar, but still satisfies your sweet tooth, here’s the recipe for you! This cake is perfect for birthdays, being free from allergens, so everyone can enjoy a slice.

Pink Cake Slice

Ingredients

3 cups Bob's Red Mill Gluten-free 1 - 1 Flour
1 ½ cups allulose sweetener (recommended Trader Joe’s allulose/stevia blend)
6 tbsp unsweetened cocoa powder
2 tsp baking soda
1 tsp salt
2 cups milk substitute
½ cup canola oil
2 tbsp apple cider vinegar
1 tsp vanilla

FROSTING
1 Color Kitchen Frosting Mix (choose your color!) with sprinkles

Directions

Preheat the oven to 350 degrees and oil two 9-inch cake pans.

In a medium bowl combine the flour, sweetener, cocoa powder, baking soda and salt.

In a smaller bowl blend milk substitute, oil, vinegar and vanilla.

Combine the wet ingredients into the dry ingredients and mix with a hand or stand mixer, scraping the sides of the bowl until fully blended.

Pour into cake pans and place in oven. Bake for 25 minutes, or until a toothpick comes out clean.

Cool before frosting.

For the frosting, try our Naturally Colorful Frosting Mix with Sprinkles.

Try our Naturally Colorful Frosting Mix with Sprinkles

Sugar Cookies | Gluten-free | Allergen-friendly

Yellow Frosting Cookies

Sweet (but not too) simple and delicious, these sugar cookies are a staple in the dessert department. Decorate with all the colors to make the cookies more bright and fun!

Ingredients

COOKIES
1 cup organic sugar
½ cup butter, room temp
1 large egg
1 tbsp milk (or substitute)
1 ½ tsp vanilla
¼ tsp salt
2 cups Bob's Red Mill Gluten-free 1 - 1 Flour

ICING
1 Color Kitchen Frosting Mix (choose your color) with sprinkles
OR
1 Color Kitchen Plain Frosting Mix with Color of your choice
1 Color Kitchen Nonpareil Sprinkles
3 tbsp milk (or substitute)
1 tsp vanilla

Directions

Mix sugar and butter for 1 minute at medium speed.

Add egg, ,milk, vanilla and salt and blend for another 30 seconds, until combined completely.

Chill for 1 hour or overnight. Cover to keep from drying.

Preheat the oven to 350F.

Lightly flour surface. Roll chilled dough to about ¼-inch thick and cut out shapes with cookie cutters.

Use non-stick baking sheet or cover with parchment paper and place cookies 1 inch apart.

Bake for 10 minutes or until edges start to brown slightly.

Cool cookies completely before decorating with icing.

While cookies are cooling prepare icing according to instructions on package. Once cooled, dip or drizzle icing on cookies and top with colorful sprinkles.

Allow icing to dry for several hours before enjoying.


pick out your frosting and sprinkles combo!