dessert

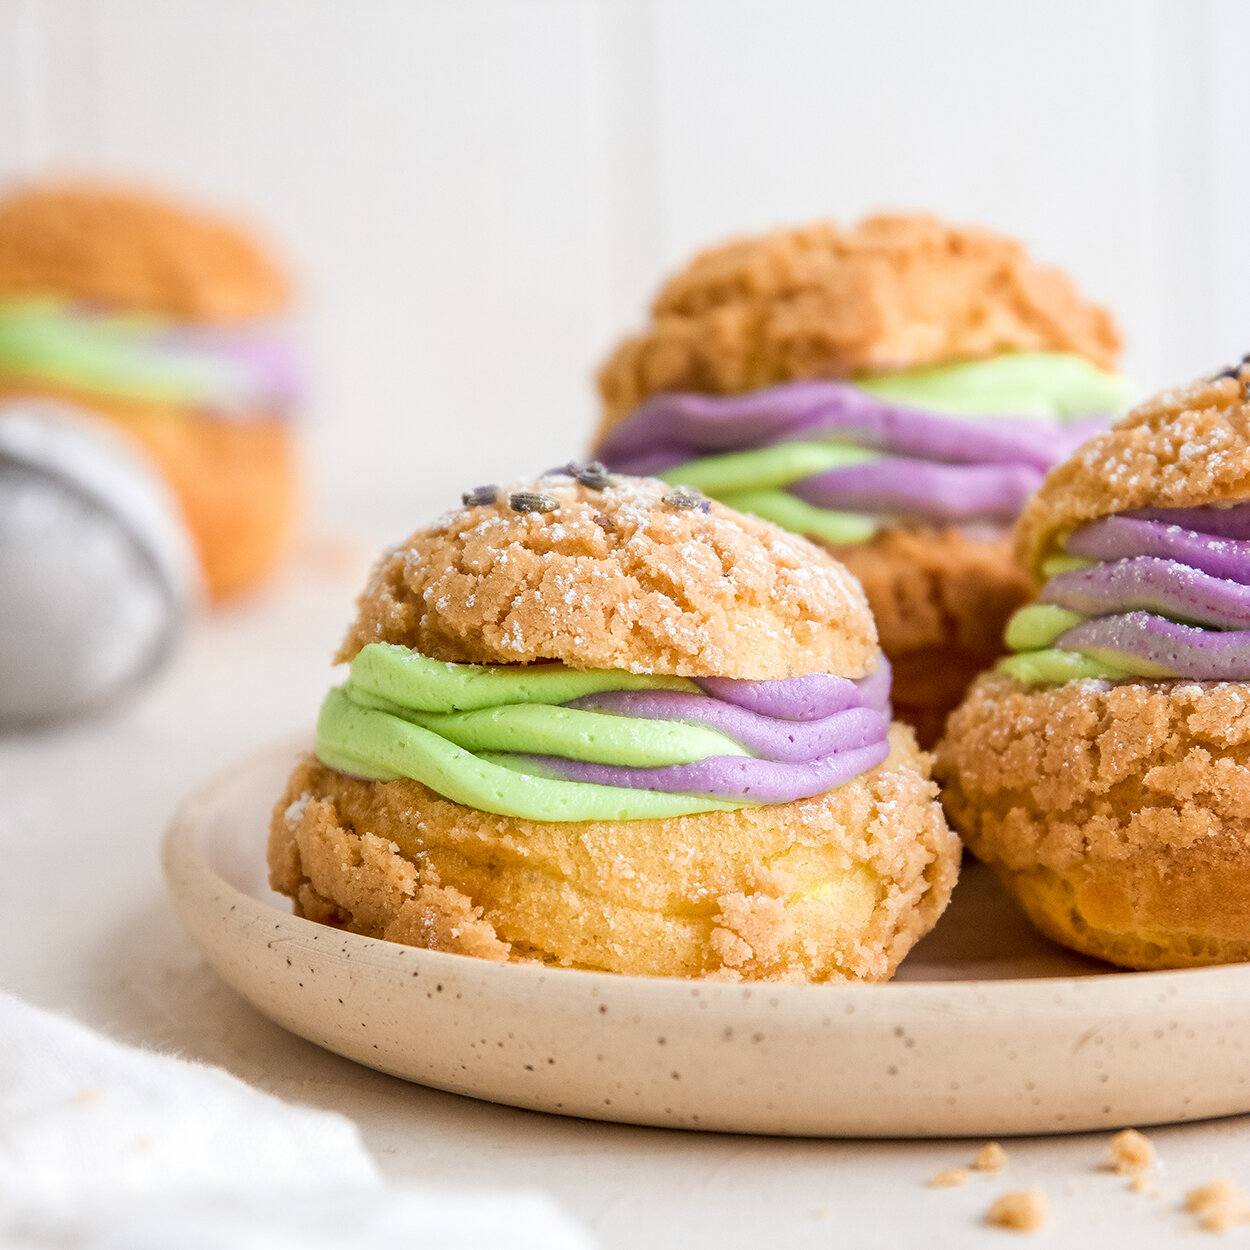
Lavender Pistachio Coconut Cream Puffs | Natural | Dye-free

Color Kitchen Cream Puffs 3-blog.jpg

MAKES: 18-22 SERVINGS
Prep time: 30 minutes, Cook time: 32 minutes

INGREDIENTS

CRAQUELIN TOPPING
½ cup (1 stick) unsalted butter, softened
1 cup all-purpose flour
½ cup brown sugar 

CHOUX PASTRY
½ cup whole milk
½ cup water
½ cup (1 stick) unsalted butter
¼ tsp salt
1 tbsp sugar
1 cup all-purpose flour
4 large eggs 

COCONUT CREAM FILLING
1 13.5-oz cans coconut cream, chilled overnight
6 tbsp confectioners’ sugar
½ tsp lavender extract
½ tsp pistachio extract
1 Color Kitchen Green Food Color packet
1 Color Kitchen Pink Food Color packet
1 Color Kitchen Blue Food Color packet

DIRECTIONS

Make the craquelin topping.  Using a stand mixer or hand mixer, mix the butter, flour, and brown sugar until they come together into a dough. 

Form the dough into a ball, then sandwich it between two sheets of parchment paper.  Roll out the dough to be about ⅛ inch thick, then place it in the freezer while you prepare the pastry.

Make the choux pastry.  Place the water, milk, butter, sugar, and salt in a medium saucepan over medium heat, and bring to a boil.  Once boiling, add the flour to the pot and stir vigorously for two minutes.  The ingredients should come together into a ball of dough.

Transfer the dough to a stand mixer with a paddle attachment and beat for 30 seconds to a minute to cool.  Add the eggs to the dough, one at a time, to create a thick batter.  The batter has the correct consistency when you can lift up the paddle, and the batter drips off in a V-shape.  If the batter is too thick and does not create a V-shape, add one additional egg.

Color Kitchen Cream Puffs 1-blog-sm.jpg

Preheat the oven to 425 degrees and line 2 baking sheets with parchment paper.

Spoon the batter into a piping bag with a large round tip.  Pipe 1 ½ inch rounds onto the baking sheets.  Cut 1 ½ inch rounds from the craquelin topping.  Press a craquelin round onto each piped cream puff.

Bake the cream puffs at 425 degrees for 10 minutes, then turn the oven temperature down to 325 degrees and bake for an additional 22 minutes, until golden brown.  Let cool for at least 15 minutes.

While the cream puffs are cooling, prepare the coconut cream filling.  Open the chilled cans of coconut cream and scoop out the cream from the top of the can. Discard the coconut water that has settled to the bottom of the cans.  Place the cream in the bowl of a stand mixer with a whisk attachment and add the confectioner’s sugar.  Whisk on high speed for 1 minute, until smooth and fluffy. 

 Divide the coconut cream between 2 bowls.  In one bowl, fold the lavender extract, blue color packet, and pink color packet into the cream.  In the other bowl, fold in the pistachio extract and green color packet.

Combine the two coconut creams in a piping bag with a star tip.  Cut each cream puff in half.  Pipe the coconut cream into the bottom half of each cream puff, then sandwich the two halves together.



Watercolor Cookies | Natural | Dye-free

winter_cookie.jpg
winter_watercolor.jpg

Create masterpieces on icing or fondant. Paint on cookies and cakes to make personal designs for your next party, holiday gift, baby shower or tea party!

INGREDIENTS

2 Color Kitchen Color packets
paint brush

DIRECTIONS

In small bowls or a paint palette mix powder colors with a couple drops of water and dissolve with brush. Only a small amount of color is needed (¼ tsp powder).

Paint on icing, fondant or frosting like watercolors.

For darker color use 1 to 1 ratio of color to water. For lighter shade use 3 to 1 ratio of color to water.

Mix colors for a range of hues.


Candy Cane Mousse | Natural

CandyCaneMousse_web1.jpg

This unique and easy to make sweet treat will have your family and friends asking for more!

MAKES: 4 JARS

INGREDIENTS

1 ½ cups organic heavy whipping cream
16 g (1 tsp) organic sugar
1 tsp organic vanilla extract
250 g (1 ⅓ cup) organic white chocolate, chopped
1 tsp organic peppermint flavor
1 Pink and 1 Yellow Color Kitchen Color packets, or 2 tsp Color Kitchen Red Velvet Color
organic candy canes, crushed

EXTRAS

3 piping bags
decorating tip #846

Candy Cane Mousse Recipe by ColorKitchen

DIRECTIONS

In a double boiler, melt the white chocolate. Once completely melted, slowly add ¼ cup of the cream and stir to combine completely.

Remove from heat place in the fridge until completely cool, about 2 hours.

Divide the ganache into two separate bowls, they should weigh about 85 g each.

In one of the bowls, add the yellow dye, pink dye and peppermint flavor and stir to combine completely.

In a stand mixer fitted with whisk attachment (or you can use a hand mixer), add the remaining cream, sugar and vanilla extract. Whisk on low and gradually turn up the speed as soon as it doesn’t splatter anymore. Turn the speed up to high and whisk until the whipped cream has formed a stiff peak.

Divide the whipped cream into the two bowls of ganache, you will have about 57 g in each bowl. Fold in the whipped cream until completely combined.

Cover with plastic wrap and put back in the fridge for at least 4 hours or overnight.

Put both the white chocolate and pink peppermint mousse in a piping bag and cut a small hole in each.

Then place them both in another piping bag with decorating tip #846.

Pipe into shallow bowls or shot glasses and serve immediately.

Top with crushed candy canes.


Recipe by Dessert'D Organic Bake Shop

Colorful Ice Cream | Paleo | Dairy Free

CrazyVanillaIceCream_blog.jpg

Here’s a healthy version of an old 90s ice cream favorite Crazy Vanilla, by the Gusty Baker. This paleo, dairy free and fodmap friendly recipe also has gelatin which is great for gut healing!

INGREDIENTS

2 cans of coconut milk or coconut cream
4 tsp of vanilla extract
1 ½ tbsp of unsweetened gelatin (1 ½ packets)
½ cup of honey, or maple syrup for low-fo
pinch of sea salt
Color Kitchen Color packets

DIRECTIONS

Pour the coconut milk in a saucepan and sprinkle gelatin on top, let it bloom for a few minutes (it will create a skin on top), then whisk in and turn on heat. Add in rest of the ingredients EXCEPT food colorings and whisk until a low boil. Take off stove. Once cooled, put in fridge until completely cold.

Put batch in ice cream maker (Cuisinart recommended) for 15-20 minutes. If you decide to skip the churning and just freeze the mixture it will work, but it won't be as creamy or soft once frozen.

Now separate the vanilla ice cream mixture into 3 equal parts, in separate bowls. Add 2 tsp+ of natural color powders to each bowl. You can adjust color to your liking. Fold around with a spatula until fully mixed in. It’s ok if the ice cream gets a little melty while you're mixing.

Then use a small loaf pan, cake pan or container of choice (make sure the ice cream will be deep enough to cover bottom and scoop) and add spoonfuls of each mixture into the pan, alternating colors. Recommended: use 3 different spoons so the colors don’t mix. Then finally take a knife and do a light swirl through the mix. Freeze until set. It’ll take about 20 minutes to thaw out to be scoopable once frozen.

~Gutsy Baker, Stephanie Charbonneau
.

Watercolor Cookies with Cream Cheese Glaze | Natural

B0064D67-9D2C-445D-B651-795DE7D64881.JPG

Unleash your inner artist with these delicious blank canvases!

INGREDIENTS

CREAM CHEESE COOKIES
2 cups unsalted butter, room temperature
8 oz package of cream cheese, softened to room temperature 
2 cups of granulated unbleached sugar cane
2 large egg yolks
1 tsp vanilla extract¼ tsp almond extract 
4 ¾  cups unbleached, all purpose flour
½ tsp sea salt

CREAM CHEESE GLAZE 
4 oz of cream cheese, softened at room temperature
4 tbsp buttermilk (or any type of milk or cream)
3 cups organic powdered sugar
1 tsp vanilla bean extract
2-3 Color Kitchen Color packets  for "gel" (powdered colors with a few drops of water or glycerin) 
1 cup of additional powdered sugar set aside for the piping

DIRECTIONS

COOKIE
Preheat oven to 350 degrees.

In a large mixing bowl using the paddle attachment, cream together the butter, cream-cheese and sugar until light and fluffy.

Add the egg yolks and extract and mix until smooth.

Add the flour and salt, mix until combined but don't over mix!

In plastic wrap, chill the dough for 2 hours (or up to 12 hours).

Take the dough out of the refrigerator and let it rest at room temperature until it is pliable enough to roll out.  Line baking sheets with parchment paper or silpat liners.  

Roll the dough onto a *lightly* floured surface between ¼"-½" thick. Thinner cookies will bake up crispier and thicker dough will be softer.  Use cookie cutters to cut into shapes and place them 2" apart on the prepared baking sheets. 

Bake for 7-12 minutes depending on the cookie size. If the centers puff up while baking, they will be soft. If they start to brown on the edges, they will be crispier in texture.  Pull them out before they start to brown if you want a softer cookie.

Cool the cookie completely before removing off the paper, otherwise they will break easily. Glaze and frost as desired! 

flooding.jpg

GLAZE  
For the flooding:

Mix together the cream cheese and 3 cups of powdered sugar with a paddle attachment until the mixture is smooth and there are no lumps. 

Add the buttermilk and extracts of your choice for desired flavor.  Continue to beat until smooth and creamy.  (If you can't get the lumps to dissolve, gently warm up this mixture over a double boiler or microwave for a few seconds.)

Remove the contents of the bowl and divide into several smaller bowls to add the coloring.  Save one cup of the mixture in the mixing bowl. The runny mixture will be used for "flooding."   and the remaining 1 cup mixture will be thickened for piping the borders. 

Add 1 cup of powdered sugar to the remaining mixture and mix until smooth.  You may need more or less depending how much buttermilk and powdered sugar you added. If you get it too thick you can add a spoon full of buttermilk at a time and/or add more powdered sugar if it is too runny.  The goal is to thicken it up enough to be able use for piping a border around the edge of the cookie to hold its shape.  If it's too runny, it will slowly drip off your cookie onto the pan.  

Pipe a border around each cookie shape and while this is setting up you can start mixing up your flooding colors. 

gel.jpg

COLOR GEL
In a small bowl add ¼ tsp water or glycerin to 1 tsp color powder.
Blend with brush or spoon until color is dissolved.
Add another ½ tsp water and blend.
Colors will be concentrated.

WATERCOLOR EFFECT
To create a marbled "watercolor" effect, divide up your flooding icing into 2-3 colors. Mix in a few drops of your pre-mixed “gel” coloring until you get at least one medium-darker shade and 1-2 colors in white or pastel shades.   

Pipe a little swirl of each color onto a cookie and continue swirling it around until it reaches the edge of your border.  Avoid over mixing so that your colors stay defined. 

To get splattered effect, tap brush on top of glazed cookie..

Color tips:  The medium-dark shade will blend in with the lighter white or pastel shade and create a 3rd color so keep this in mind when choosing colors. If you use all pastel colors for example, you won't be able to see the marble effect.    

The bright pink and yellow mixed together created a peachy orange hue when swirled.  We used uncolored white, yellow and pink to create this effect.  

Choose primary colors that make secondary colors, such as blue and pink will create purple when mixed.  Blue and green create a foamy sea green, and so on...    

Colors like purple and yellow swirled together will produce a muddy-brown color when mixed.


NOTE: This glaze will not harden up like royal icing and will take much longer to dry, but it is a delicious substitute   We especially love the "brown sugar" flavor of the unbleached organic sugar cane, but you can use white sugar instead. 

Recipe by: Kayla Peters, The Round House Bakery

Blue Moon Milkshake | Natural | Dye-free

Who doesn’t love a good milkshake? Make it blue, and voila! Even better.

MAKES: 2 MILKSHAKES

INGREDIENTS

510 g. (18 oz.) Vanilla Bean Ice Cream
¾ cup milk
2 tsp lemon flavor
1 tsp orange flavor
1 tsp all natural cherry flavor
1 Blue Color Kitchen Color packet

WHIPPED CREAM
½ cup heavy whipping cream
7 g. sugar
½ tsp vanilla extract
1 Color Kitchen Rainbow Sprinkles packet

DIRECTIONS

First, make the whipped cream. Using your stand mixer with whisk attachment, or with a hand mixer, add the heavy whipping cream, sugar and vanilla extract to the mixing bowl.

Whisk slowly at first, then gradually turning up the speed as the whipped cream thickens until you are at full speed. Whisk until the whipped cream is thick and doesn’t fall off the whisk.

Put whipped cream in a piping bag with decorating tip #846.

In a blender, add the ice cream, milk, lemon flavor, orange flavor, cherry flavor and blue dye. Blend until you have a smooth and creamy milkshake.

Pour into milkshake glasses and top with whipped cream.

Sprinkle with rainbow sprinkles!

Baker's Note: To make this vegan, just use organic vanilla vegan ice cream (like Coconut Bliss) and use organic coconut milk instead of milk! 

Cream Cheese Mints | Gluten-free | Natural

CreamCheeseMints_0047.jpg

Feel like a fancy baker with these colorful creations. Practice your piping and your color combos, and see what you can come up with!

MAKES: 10 DOZEN

INGREDIENTS

8 oz. organic cream cheese (one package)
2 tbsp (28 g.) organic salted butter
1 tsp organic coconut oil
850 g. (6 cups) organic powdered sugar, sifted
1 tbsp organic peppermint flavor (or if you’re using extract only 1 ½ tsp)
2-3 Color Kitchen Color packets (yellow, pink, blue shown here)
water

DIRECTIONS

In the bowl of your stand mixer fitted with the paddle attachment, add the cream cheese, butter and coconut oil. Mix on low until combined then speed mixer up to high and whip for 1-2 minutes. 

Turn the speed down to medium and slowly incorporate all the powdered sugar. Once completely incorporated, scrape down the sides of the mixing bowl and add the vanilla extract and peppermint flavor. Then turn speed up to high and whip again for 1-2 minutes.

Separate into three different bowls, each bowl should have about 221 g. each.

In one bowl add ½ tsp yellow and just a drop of water on top of the yellow to help incorporate. Stir to combine completely.

In the second bowl, add ⅛ tsp pink and ⅛ tsp blue to make lavender and a drop of water. And in the third, add ¼ tsp blue and ¼ tsp yellow to make mint and a drop of water. Stir both so they are completely combined.

Put each color in a piping bag with decorating tip #864.

CreamCheeseMints_0012.jpg

Line two baking sheets with parchment paper. Pipe little dollops onto a baking sheet with parchment paper.

Place in the fridge until set, about 6 hours or overnight.

Store in the fridge.


Galaxy Doughnuts | Dye-free | Natural

galaxy_round_web.jpg

These little gems are out of this world. Color glaze with our plant-based extracts and take your treats to another dimension!

MAKES: GLAZE FOR 2 DOZEN DOUGHNUTS

INGREDIENTS

1-2 dozen doughnuts
2 cups powdered sugar
¼ cup coconut milk or any milk equivalent
1 tbsp coconut oil (melted)
½ tsp Color Kitchen vanilla extract
1 Blue Color Kitchen Color packet
1 Pink Color Kitchen Color packet
sparking sugar (recommend Bob’s Red Mill cane sparkling sugar)
black cocoa (optional)

swirl_web.jpg

DIRECTIONS

Split powdered sugar into 4 bowls, ½ cup each. Add ½ tsp pink color to one bowl, ½ tsp blue color to second bowl, and ½ tsp pink color and ½ tsp blue color to third (for purple). Leave fourth bowl plain for white glaze. Blend color with powdered sugar.

In another bowl whisk together the milk, coconut oil and vanilla. Add equal parts of the liquid mixture (4 tsp) to the colored powdered sugar bowls and mix each with a spoon until all the color is dissolved. If coconut oil begins to harden, put bowl in microwave for 10 seconds and stir until coconut clumps have dissolved.

with black cocoa (optional)

with black cocoa (optional)

In a shallow tray pour all the color glazes in separate parts of the bowl and swirl very lightly with a spoon to make a spiral pattern. Splatter top with ½ tsp black cocoa powder.

Dip doughnuts and swirl to cover top.

Place icing-side up on a wire rack over a baking sheet to maintain dripped icing.

Sprinkle tops with sparkling sugar and let dry.

galaxy1_web.jpg
galaxydoughnuts_light.jpg

BAKERS NOTE: For a little extra, dip in colored chocolate after glaze has dried!

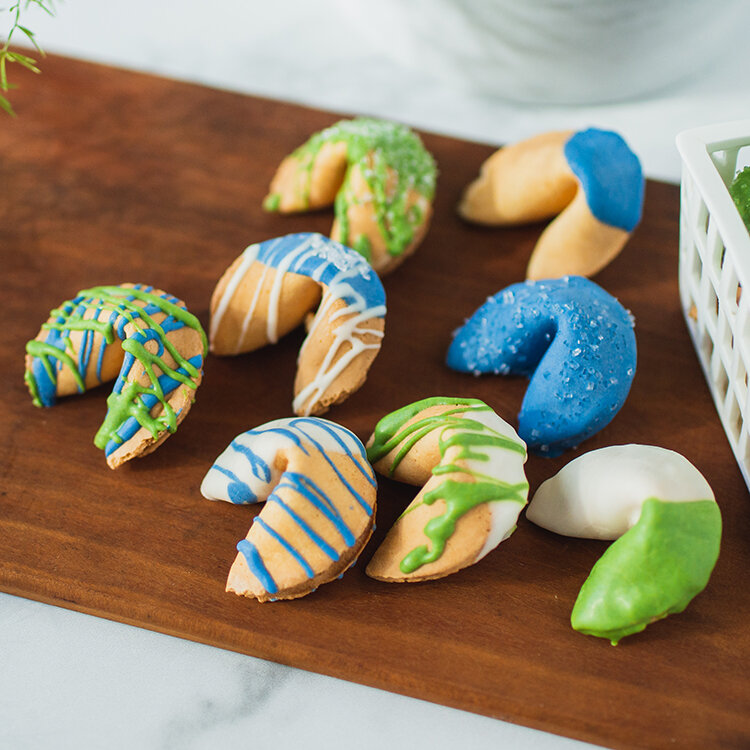
Colored Chocolate Decorated Fortune Cookies | Natural

Fortune_Web_White_Chocolate.jpg

Take your fortune cookies to a new level. Dipping and drizzling colored chocolate transforms your secret message-filled cookies, making them a fun treat for a special occasion or to giveaway as a gift.

INGREDIENTS

12 fortune cookies
2 cups white melting (recommended: ChocoMaker Fountain Formula)
2-3 Color Kitchen Color packets

DIRECTIONS

Melt chocolate for 1-2 minutes in microwave or on stovetop and stir. Do not overheat.

Once chocolate is melted add 1 color packet per ¼ cup melted chocolate. Work on 1 color at a time and stir until color is blended.

While chocolate is still melted, dip fortune cookies or drizzle over top.

Keep remaining white chocolate warm and then work on next colors.

Do not reheat.

Let cool before serving.

Red Velvet Ice Cream | Dye-free | Natural

RedVelvet_IceCream_Web.jpg

Transform your plain vanilla ice cream into a chocolaty, tasty red velvet ice cream treat.

MAKES: 3-4 SCOOPS

INGREDIENTS

2 cups vanilla ice cream
1 Red Velvet Color Kitchen Color packet
3 tbsp yogurt
1 tbsp cocoa powder

DIRECTIONS

Add ice cream, red velvet color, yogurt and cocoa powder in blender and throughly mix. Enjoy as ice cream or a creamy milkshake.

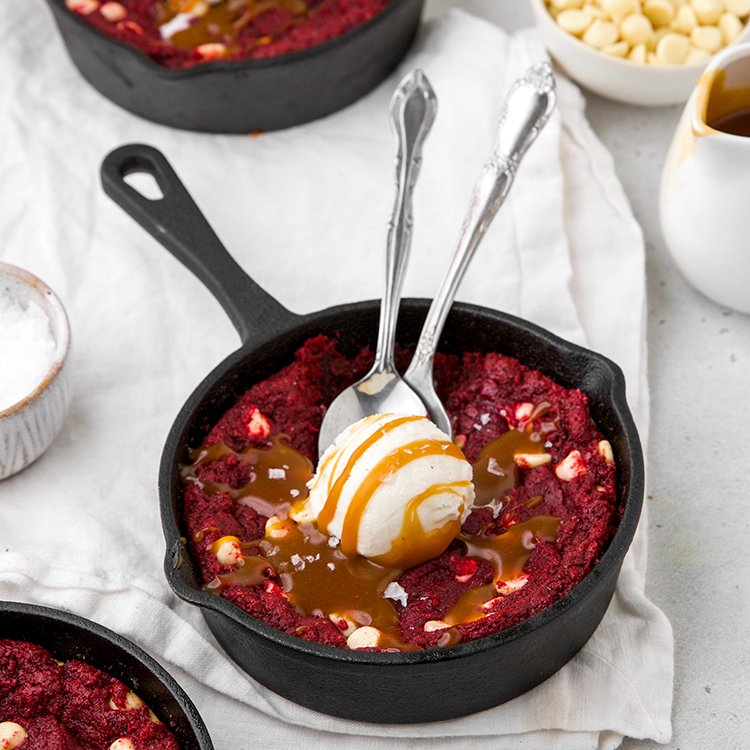
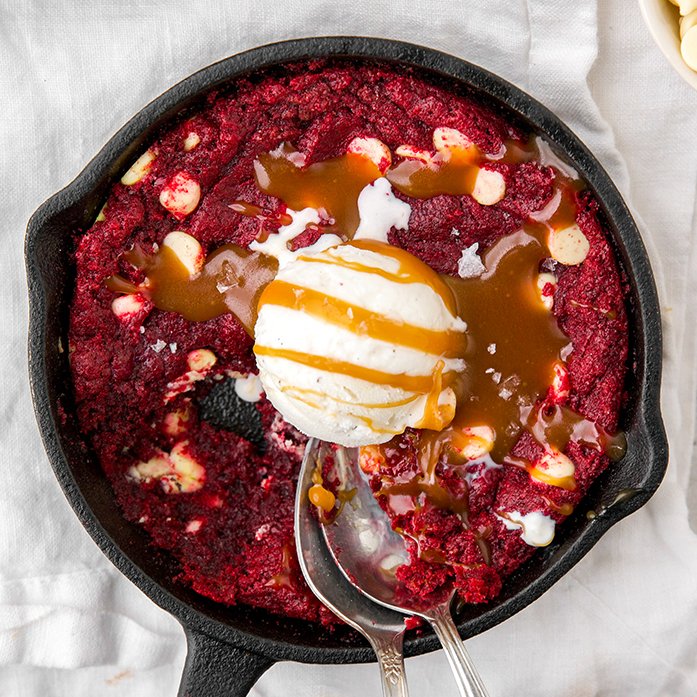
Red Velvet Skillet Cookie Sundaes - Artificial Dye-free | Gluten-free

Baked in cast iron skillets, these gluten-free red velvet cookie pies are served warm, melting with white chocolate, caramel, and ice cream yumminess. A perfect holiday dessert for those cold nights, to be shared with those you love.

MAKES: 3 COOKIE PIES
Prep Time: 10 minutes
Cook Time: 30 minutes

INGREDIENTS

COOKIES
1 bag Color Kitchen Red Velvet Cookie Mix
1 egg (room temp)
1 tbsp buttermilk (or yogurt)
1 stick butter (softened), plus some for greasing the skillets
1 tsp vanilla
½ cup white chocolate chips

CARAMEL SAUCE
1 cup granulated sugar
1 stick butter
½ cup heavy whipping cream

TOP WITH
3 scoops vanilla ice cream

DIRECTIONS

Preheat the oven to 325 degrees and grease 3 mini cast iron skillets with butter.

Prepare the red velvet cookie dough according to the instructions on the package (vegan option available).  Fold in the white chocolate chips.

Divide the cookie dough evenly between the 3 skillets and press it into the bottom of the skillets.  Place the skillets in the refrigerator to chill for 15 minutes.

When the dough is done chilling, transfer the skillets to the oven and bake for 16 minutes.

While the skillet cookies are baking, prepare the caramel sauce. Heat sugar in a small skillet over medium heat, stirring constantly until it is totally melted.  The sugar will form clumps before beginning to melt.  Once the sugar melts, add the butter and stir until it is melted.  The mixture will sizzle up when the butter is added.  Don’t be alarmed, this is normal.  When the butter is melted, add the heavy cream (the mixture will sizzle up again) and stir until all of the ingredients are evenly combined.  Let the caramel simmer for 2 minutes, then remove from heat and let cool.

When the cookies are finished baking, let them cool for at least 10 minutes.

Once the cookies are finished cooling, top each one with a scoop of vanilla ice cream and drizzle with caramel sauce.

Shortbread Cookies with Royal Icing and Candied Flowers and Herbs | Artificial Dye-free

candied flower shortbread cookie

These cookies are absolutely gorgeous and invite you to get creative in decorating with nature!

MAKES: 16-18 COOKIES

INGREDIENTS

COOKIES
⅓ cup rice flour
1½ tsp kosher salt
2½ cups all-purpose flour, plus extra for rolling dough
1 cup (2 sticks) plus 6 Tbsp. unsalted butter, cut into pieces, room temperature
¾ cup granulated sugar
candied flowers and/or herbs for decorating

ROYAL ICING
3 large egg whites
4 cups powdered sugar
½ tsp cream of tartar
2-3 Color Kitchen Color packets
a couple drops of water or glycerin for mixing colors

DIRECTIONS

ICING
Using a wooden spoon or rubber spatula, stir egg whites, powdered sugar, and cream of tartar in a medium bowl until a thick paste forms with no dry spots. Ideally, icing should sit at least 12 hours for sugar to fully hydrate (it can be covered and chilled up to 1 week), but it can be used as soon as cookies have cooled.

Bring to room temperature before using. In separate bowls mix colors with a couple drops of water or glycerin to form a smooth paste. For pastels use about ½ a packet per bowl. Starting slowly add icing to colors. Stir and continue adding until you have reached the desired intensity of color.

Cover your bowls of colored icing well with plastic to avoid them drying out until you are ready to start decorating. 

SHORTBREAD
Whisk rice flour, salt, and 2½ cups all-purpose flour in a medium bowl. Using a stand mixer with the paddle on medium-high, beat butter and sugar until very pale and fluffy, about 5 minutes. Mix in dry ingredients on low until fully combined. Form into a flat disk and wrap in plastic and chill at least 2 hours, and up to 2 days.

Preheat oven to 350°. Roll out dough between 2 sheets of lightly floured parchment to ⅛” thick. Using large cutter, cut out 16 rounds, re-rolling scraps. Using small cutter, punch out centers. Bake on parchment-lined baking sheets until edges are golden, 12–14 minutes. Let cool on a wire rack.

DECORATING
Ice your cookies using the instructions in the link below. This method is called “flooding”. While the icing is still wet add your candied flowers in any design you like. Let them dry completely before storing them in a single layer in an air-tight container.

Excellent video showing how to ice cookies.        
How to make candied flowers.

- Recipe by chef Rose Archer