ice cream

Shamrock Shake & Maraschino Cherries | Natural | Artificial Dye-free

Shamrock Shake Natural Green Color

Natural St. Patrick's Day shake recipe with homemade maraschino cherries - free from artificial dyes and ingredients!

MAKES: 1 MILKSHAKE
Prep Time: 10 minutes

Ingredients

1 cup vanilla ice cream (or vegan ice cream)
½ cup whole milk (or milk alternative)
¼ tsp peppermint extract
1 Color Kitchen Green Color Packet (you can use 2 packets for a deeper color)
Optional toppings: whipped cream, fresh or maraschino cherries

Shamrock Shake Natural Green Color

Directions

Add the ice cream, milk, peppermint extract, and color packet to a blender and blend until combined.

Pour into a glass and top with the toppings of your choice! 

make your own maraschino cherries

Prep Time: 10 minutes
Cook Time: 10 minutes 

Ingredients

1 cup fresh cherries, pitted
½ cup water
½ cup sugar
1 ½ tsp lemon juice
½ tsp vanilla extract
¼ tsp almond extract

Directions

 In a small saucepan over medium heat, combine the sugar and water.  Stir over heat until the sugar has melted.  Remove from heat and stir in the lemon juice, vanilla extract, and almond extract.

Place the cherries in a sealable jar.  Pour the syrup on top.  Seal the jar and place it in the fridge.  Let the cherries sit in the fridge for 2-3 days before using.

Homemade Summertime Popsicles | Paleo-friendly | Dairy-free | Vegan

red-white-and-blue-patriotic-popsicles-july-4th.jpeg

These colorful firecracker popsicles are made with just a few simple ingredients. Enjoy a paleo-friendly and dairy-free treat while cooling off during those hot summer days and holidays!

~Recipe developed by Noelle Tarr, Coconut & Kettlebells.

RED-WHITE-web.jpg

INGREDIENTS

6 medium strawberries
3 tbsp honey
½ cup + 3 tbsp coconut water
¼ cup blueberries, frozen
¾ cup full-fat coconut milk (canned)
½ Color Kitchen Color packets (blue and pink)

DIRECTIONS

To make the red layer, add the strawberries, 1 tbsp honey, and 3 tbsp coconut water and a ½ pink color packet (for brighter color) to a high-speed blender and blend until smooth. Pour the contents into a separate container and rinse out the blender.

To make the white layer, add 2 tbsp honey, ½ cup coconut water, and the coconut milk to a high-speed blender and blend until smooth. Pour half of the white mixture into a separate container.

To make the blue layer, add the blueberries and ½ a blue color packet (or ½ pink and ½ blue for brighter purple) to the blender with the remaining white mixture. Blend until smooth.

To assemble the popsicles, pour the blue layer into each mold so that it fills ⅓ of the mold. Use a paper towel to clean any drips on the inside of the mold where the next layers will go. Freeze for 45 minutes.

Once frozen, create red and white stripes by pouring the white mixture into each mold so that it fills about 1/6th of mold and freeze for 35-40 minutes. Repeat this process with a red layer and another white layer, freezing each layer separately for about 30 minutes. Pour the last red layer into the mold and insert a popsicle stick into each mold and freeze overnight.

To help release the popsicles, run the molds under warm water for 15 seconds.

Candy Corn Ice Cream | Dairy-free | Paleo | Refined Sugar-free | Gluten-free

CandyCornIceCream_BLOG.jpg

Making your own ice cream is really not as complex as it may seem, and let’s be real, who doesn’t want this on hand in the freezer?

WHAT YOU NEED

Ice cream maker (optional but recommended!)
Saucepan
Whisk
A bread pan or airtight container

INGREDIENTS

2 cans of full fat coconut milk
1 tbsp of unsweetened gelatin powder
6-8 tbsp of honey
1 tbsp vanilla extract
Sprinkle of sea salt
1 Orange Color Kitchen Color packet
1 Yellow Color Kitchen Color packet

DIRECTIONS

If you are using an ice cream maker, make sure your ice cream bowl is frozen in advance.

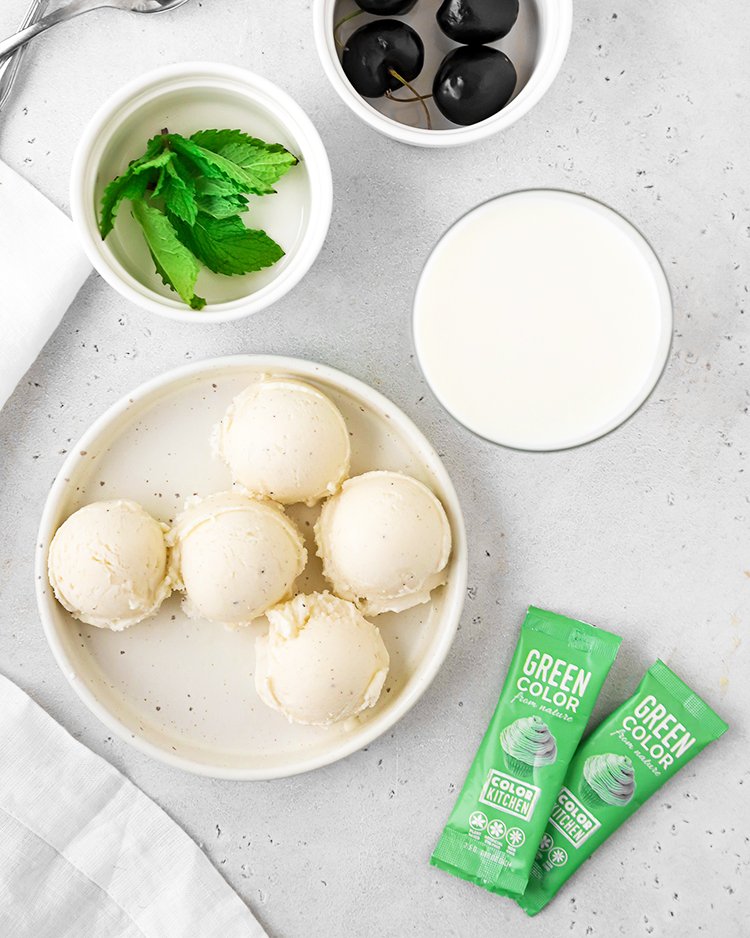
Add cans of coconut milk to a saucepan and sprinkle the gelatin on top. Let sit for 3 minutes until a skin forms, and then whisk it into the milk.

Turn on your stove to medium heat and add in the honey, vanilla and sea salt. Start with 6 tbsp of honey and taste, if you want more honey flavor, or sweeter, add another tablespoon until your desired sweetness. The more honey you add, the more the ice cream will taste like candy corn! I recommend 8 tbsp (½ cup).

Heat your mixture until it reaches a low boil, then turn down and let simmer for 2 minutes.

Remove from heat and let cool until just room temperature. Then transfer into an airtight container and refrigerate until completely cold. Overnight is best. The mixture should firm up like a pudding/jiggly texture.

Once cold, transfer to your ice cream maker and churn for 20 minutes, or until ice cream is ready, per your machine. If you skip this step, your ice cream will not be as creamy but will still taste great. (You would just mix your cold mixture well until it’s smooth, skipping the churning).

When you have your honey-vanilla ice cream ready, divide it into three bowls evenly. Add one packet of orange to one bowl, and a one packet of yellow to the another bowl. Mix them in until you have a nice even color. You can add another packet of color if you want your colors to be more vibrant. Leave the last white bowl as is.

Now layer your ice cream in a small bread pan (or elongated airtight container) in three rows, starting with the white. Scoop the orange in the middle, and the fill the rest in with the yellow. So it looks like a candy corn! Optional to sprinkle real candy corns on top.

Place in freezer to set, about 45 minutes. Scoop and enjoy! It may take up to 30 minutes for your ice cream to be scoopable out of the freezer once fully set.

Recipe notes: 

-You don’t have to churn this ice cream but I highly recommend it. It makes it nice and creamy, and ice cream makers aren’t intimidating! If you decide to omit this step, just use your mixture out of the refrigerator, and mix really well before dividing into the bowls

-You can use less honey but this is what makes it taste like candy corn! I’d start with 6 tbsp and add more from there. If you want less sweet, start with 4 tbsp and add from there.

~Gutsy Baker, Stephanie Charbonneau


Colorful Ice Cream | Paleo | Dairy Free

CrazyVanillaIceCream_blog.jpg

Here’s a healthy version of an old 90s ice cream favorite Crazy Vanilla, by the Gusty Baker. This paleo, dairy free and fodmap friendly recipe also has gelatin which is great for gut healing!

INGREDIENTS

2 cans of coconut milk or coconut cream
4 tsp of vanilla extract
1 ½ tbsp of unsweetened gelatin (1 ½ packets)
½ cup of honey, or maple syrup for low-fo
pinch of sea salt
Color Kitchen Color packets

DIRECTIONS

Pour the coconut milk in a saucepan and sprinkle gelatin on top, let it bloom for a few minutes (it will create a skin on top), then whisk in and turn on heat. Add in rest of the ingredients EXCEPT food colorings and whisk until a low boil. Take off stove. Once cooled, put in fridge until completely cold.

Put batch in ice cream maker (Cuisinart recommended) for 15-20 minutes. If you decide to skip the churning and just freeze the mixture it will work, but it won't be as creamy or soft once frozen.

Now separate the vanilla ice cream mixture into 3 equal parts, in separate bowls. Add 2 tsp+ of natural color powders to each bowl. You can adjust color to your liking. Fold around with a spatula until fully mixed in. It’s ok if the ice cream gets a little melty while you're mixing.

Then use a small loaf pan, cake pan or container of choice (make sure the ice cream will be deep enough to cover bottom and scoop) and add spoonfuls of each mixture into the pan, alternating colors. Recommended: use 3 different spoons so the colors don’t mix. Then finally take a knife and do a light swirl through the mix. Freeze until set. It’ll take about 20 minutes to thaw out to be scoopable once frozen.

~Gutsy Baker, Stephanie Charbonneau
.

Blue Moon Milkshake | Natural | Dye-free

Who doesn’t love a good milkshake? Make it blue, and voila! Even better.

MAKES: 2 MILKSHAKES

INGREDIENTS

510 g. (18 oz.) Vanilla Bean Ice Cream
¾ cup milk
2 tsp lemon flavor
1 tsp orange flavor
1 tsp all natural cherry flavor
1 Blue Color Kitchen Color packet

WHIPPED CREAM
½ cup heavy whipping cream
7 g. sugar
½ tsp vanilla extract
1 Color Kitchen Rainbow Sprinkles packet

DIRECTIONS

First, make the whipped cream. Using your stand mixer with whisk attachment, or with a hand mixer, add the heavy whipping cream, sugar and vanilla extract to the mixing bowl.

Whisk slowly at first, then gradually turning up the speed as the whipped cream thickens until you are at full speed. Whisk until the whipped cream is thick and doesn’t fall off the whisk.

Put whipped cream in a piping bag with decorating tip #846.

In a blender, add the ice cream, milk, lemon flavor, orange flavor, cherry flavor and blue dye. Blend until you have a smooth and creamy milkshake.

Pour into milkshake glasses and top with whipped cream.

Sprinkle with rainbow sprinkles!

Baker's Note: To make this vegan, just use organic vanilla vegan ice cream (like Coconut Bliss) and use organic coconut milk instead of milk! 

Red Velvet Ice Cream | Dye-free | Natural

RedVelvet_IceCream_Web.jpg

Transform your plain vanilla ice cream into a chocolaty, tasty red velvet ice cream treat.

MAKES: 3-4 SCOOPS

INGREDIENTS

2 cups vanilla ice cream
1 Red Velvet Color Kitchen Color packet
3 tbsp yogurt
1 tbsp cocoa powder

DIRECTIONS

Add ice cream, red velvet color, yogurt and cocoa powder in blender and throughly mix. Enjoy as ice cream or a creamy milkshake.

Red Velvet Skillet Cookie Sundaes - Artificial Dye-free | Gluten-free

Baked in cast iron skillets, these gluten-free red velvet cookie pies are served warm, melting with white chocolate, caramel, and ice cream yumminess. A perfect holiday dessert for those cold nights, to be shared with those you love.

MAKES: 3 COOKIE PIES
Prep Time: 10 minutes
Cook Time: 30 minutes

INGREDIENTS

COOKIES
1 bag Color Kitchen Red Velvet Cookie Mix
1 egg (room temp)
1 tbsp buttermilk (or yogurt)
1 stick butter (softened), plus some for greasing the skillets
1 tsp vanilla
½ cup white chocolate chips

CARAMEL SAUCE
1 cup granulated sugar
1 stick butter
½ cup heavy whipping cream

TOP WITH
3 scoops vanilla ice cream

DIRECTIONS

Preheat the oven to 325 degrees and grease 3 mini cast iron skillets with butter.

Prepare the red velvet cookie dough according to the instructions on the package (vegan option available).  Fold in the white chocolate chips.

Divide the cookie dough evenly between the 3 skillets and press it into the bottom of the skillets.  Place the skillets in the refrigerator to chill for 15 minutes.

When the dough is done chilling, transfer the skillets to the oven and bake for 16 minutes.

While the skillet cookies are baking, prepare the caramel sauce. Heat sugar in a small skillet over medium heat, stirring constantly until it is totally melted.  The sugar will form clumps before beginning to melt.  Once the sugar melts, add the butter and stir until it is melted.  The mixture will sizzle up when the butter is added.  Don’t be alarmed, this is normal.  When the butter is melted, add the heavy cream (the mixture will sizzle up again) and stir until all of the ingredients are evenly combined.  Let the caramel simmer for 2 minutes, then remove from heat and let cool.

When the cookies are finished baking, let them cool for at least 10 minutes.

Once the cookies are finished cooling, top each one with a scoop of vanilla ice cream and drizzle with caramel sauce.

Colored Chocolate Dipped Cones | Natural

Chocolate_cones_web.jpg

Jazz up your cones with naturally colorful chocolate! Dip your cones into plant-based colored chocolate for an extra special ice cream treat.

INGREDIENTS

ice cream cones
1 cup white melting chocolate
1-2 Color Kitchen Color packets

DIRECTIONS

Melt chocolate for 1-2 minutes in microwave or on stovetop and stir. Do not overheat.

Once chocolate is melted add 1 color packet per ¼ cup melted chocolate. Work on 1 color at a time and stir until color is blended.

While chocolate is still melted, dip cones.

Keep remaining white chocolate warm and then work on next color.

Do not reheat.

Let cool before adding a scoop of delicious ice cream.

Pumpkin Cardamom Spice Ice Cream | Natural | Dye-free

PumpkinSpiceIceCream_web.jpg

A delicious no-churn ice cream recipe anyone can make, embellished with dark chocolate and fall pumpkin seeds.

MAKES: ½ gallon ice cream

INGREDIENTS

2 cups heavy cream
2 tsp vanilla extract
1 tsp orange flavor
½ tsp cinnamon
¼ tsp cardamom
½ cup organic sugar
1 cup dark chocolate shavings
1 Pink Color Kitchen Color packet
1 Yellow Color Kitchen Color packet

DIRECTIONS

With a hand or standing mixer, combine all ingredients

but chocolate and pumpkin seeds.

Whip until color fully blended and stiff peaks form.

Pour into cake pan or 2 bread loafs.

Stir in chocolate shavings.

Top with pumpkin seeds.

Cover and put in freezer overnight.

Let thaw 10-15 min before serving.

Enjoy!

Cardamom_Pumpkin_Spice_Ice_Cream.jpg

Greek Yogurt Popsicles

Between the artificial coloring and sugars in a variety of frozen treats, it's hard to feel good about feeding  your kids some of the summer treats they crave most.

Try our quick and easy-to-make alternative, Greek yogurt popsicles made with ColorKitchen food coloring, for a protein-packed, real-food choice for the summer months.

INGREDIENTS

1 cup Greek yogurt
1 tbsp honey
2 tbsp chocolate chips
2-3 Color Kitchen Color packets

DIRECTIONS

Using your favorite Greek yogurt, add a tablespoon of honey per cup of yogurt. Next, stir in as much Color Kitchen color powder as desired until thoroughly blended. Lastly, mix in a few chocolate chips. 

Thoroughly mix all ingredients together. Scoop into popsicle molds and allow to set in the freezer. 

For multiple colors, scoop in one color layer at a time, then freeze.

If you don't have a nifty popsicle-making container like the one in this post, use an ice cube tray with toothpicks for mini popsicles.