cake

Christmas Cookie Cake with Rosemary & Cranberries | Artificial Dye-free | Natural Ingredients

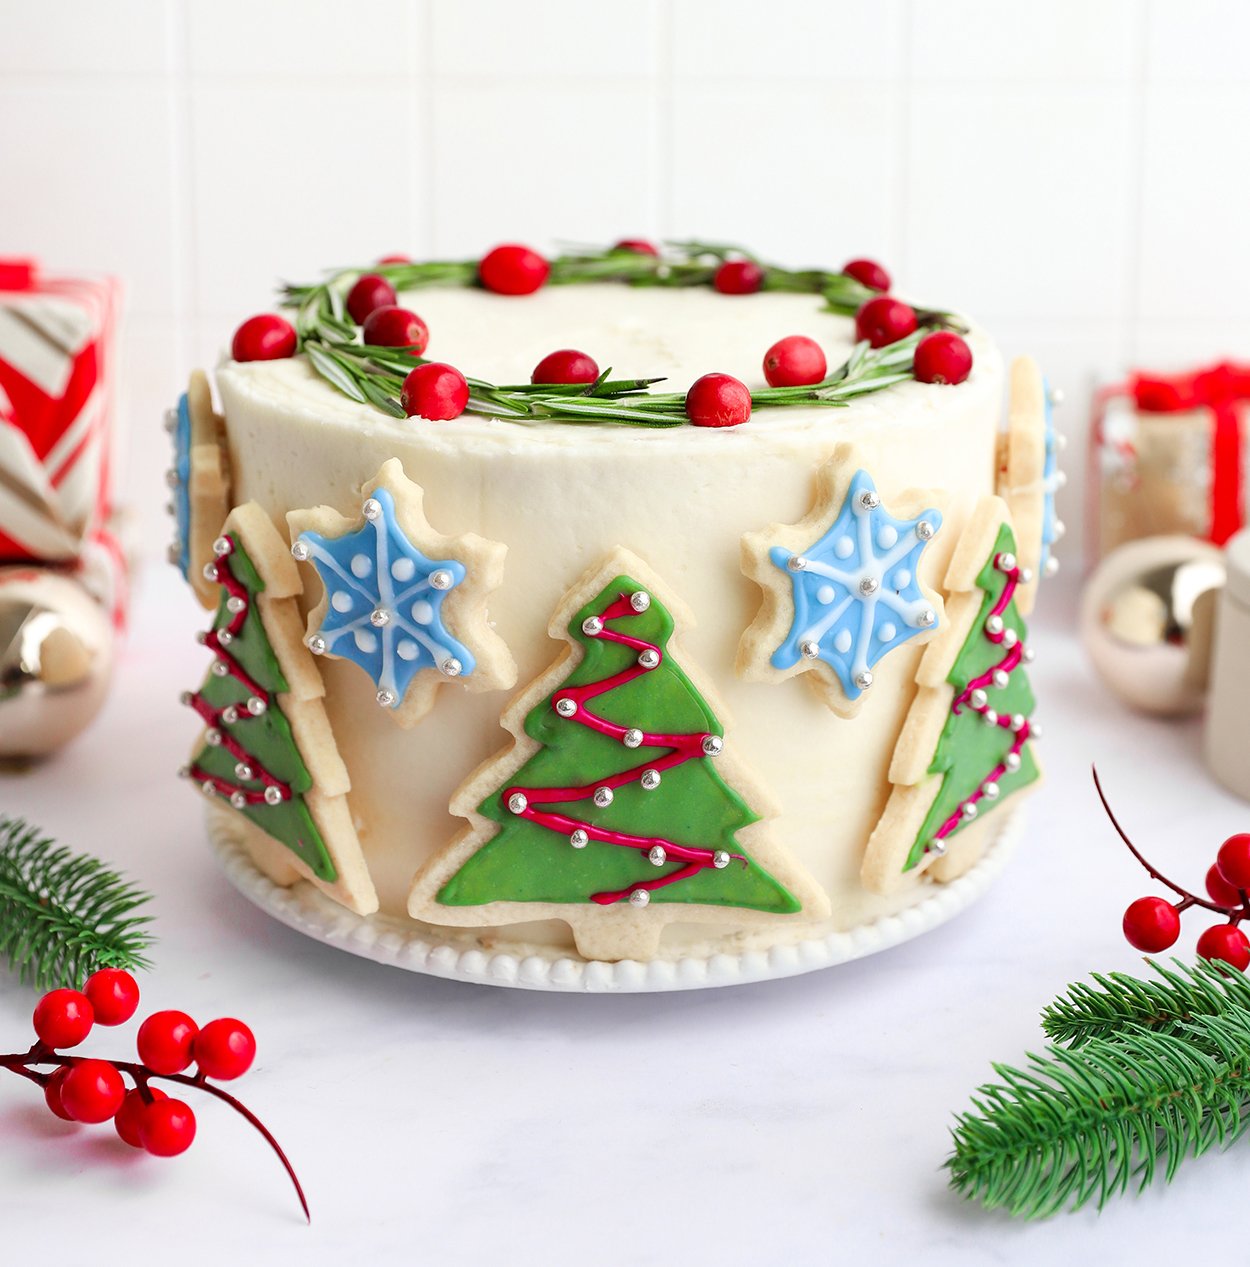
Who needs to decide between cookies & cake, when you can have both! Use your decorated Christmas cookies to embellish this festive holiday cake made from all natural ingredients.

MAKES: 16 SERVINGS
Prep Time: 2 hours
Cook Time: 40 minutes

INGREDIENTS

CAKE
1 ½ cup (3 sticks) unsalted butter, softened
3 ⅓ cup granulated sugar
6 large eggs, at room temperature
2 tsp vanilla extract
2 cups whole milk
5 cups all-purpose flour
4 ½ tsp baking powder
1 tsp salt
2 cups whole milk

BUTTERCREAM FROSTING
2 packs Color Kitchen Plain Frosting Mix
1 cup butter (or substitute)
3 tbsp milk (or substitute)
2 tsp vanilla

COOKIES
½ cup unsalted butter, softened
½ cup granulated sugar
1 tsp vanilla extract
1 large egg, at room temperature
1 ¼ cups all-purpose flour
¼ tsp baking powder
¼ tsp salt

ICING
1 bag Color Kitchen Holiday Icing Mix
3 tbsp milk
½ tsp vanilla
A couple drops coconut oil to prevent cracking (optional)

DIRECTIONS

CAKE LAYERS

Preheat the oven to 350 degrees and grease 4 8-inch round pans.  Note: if you only have 2 8-inch pans, half the recipe and make it in 2 batches.

In a large bowl with a hand mixer, beat together the butter and sugar on medium speed for 3 minutes.  Add the eggs and vanilla to the butter mixture and beat until combined.

In a separate bowl, whisk together the flour, baking powder, and salt.

Add half of the flour mixture to the wet ingredient mixture and beat until combined.  Add the milk and beat again until combined.  Add the remaining flour and beat until you have a smooth batter.

Divide the batter evenly among the 4 pans and bake for 30 minutes, until a toothpick inserted in the center of the cake comes out clean.

Allow the cakes to cool in the pans for 10 minutes, then invert onto a cooling rack.

BUTTERCREAM

In a stand mixer with a beater attachment, beat the butter and vanilla on medium speed until smooth and creamy.

Add the powdered sugar, one cup at a time, beating on low speed between each addition until smooth.

Slowly add the milk and continue to beat on low speed until incorporated.

COOKIES

In a stand mixer with a beater attachment, beat together the butter and sugar on high speed for 3-4 minutes 

Add the eggs and vanilla to the butter mixture and beat on low speed until combined.

Add the flour, salt, and baking powder and beat until all ingredients are combined in a smooth dough.

Form the dough into a disk and wrap with plastic wrap.  Place in the fridge to cool for 1-2 hours.

Preheat the oven to 350 degrees and line a baking sheet with parchment paper.

When the dough is done chilling, roll it out into a ½-inch thick sheet.  Cut out cookie shapes using cookie cutters of your choice.

Place the cookies on the baking sheet and bake for 10 minutes.  Let cool for at least 15 minutes before decorating with icing.

ICING

Prepare the icing according to the instructions on the package.  Optional: add a couple drops of coconut oil to prevent cracking.

Divide the icing between 2-4 bowls, and mix in color packets of your choice.

CAKE ASSEMBLY

Decorate the cookies with the icing as desired and set aside for at least 1 hour to let the icing harden.

Assemble the cake.  Place one cake layer on a plate or cake stand.  Add a layer of frosting on top, then stack the second cake layer on top.  Repeat with all of the cake layers, then frost the outside of the cake.

Place a teaspoon dollop of buttercream on the back of each cookie, then stick the cookies onto the cake.

Optional: decorate the top of the cake with rosemary sprigs and cranberries.

Black Chocolate & Orange Bundt Cake with Greek Yogurt | DYE-free

Color Kitchen Black Cake 3-web_blog.jpg

This Halloween or Thanksgiving, try our super rich and moist black chocolate cake recipe, made with Greek yogurt and natural ingredients. Topped with an artificial dye-free bright orange icing made easy with our Icing (frosting) Mixes.

MAKES: 1 BUNDT CAKE
Prep time: 15 minutes
Cook time: 45 minutes

Color Kitchen Black Cake 1-blog.jpg

INGREDIENTS

CAKE
1 cup (2 sticks) unsalted butter (plus some for greasing the pan)
1 cup whole milk
⅓ cup black Dutch-process cocoa powder
2 cups all-purpose flour
1 ¾ cup granulated sugar
1 ½ tsp baking powder
½ tsp salt
2 eggs
½ cup plain Greek yogurt

ICING
1 Color Kitchen Plain Icing (Frosting) Mix
3 tbsp milk or milk alternative
1 Color Kitchen Orange Color Packet
½ tsp natural orange extract

DIRECTIONS

Preheat the oven to 350 degrees and grease a 10-cup bundt pan.

In a small saucepan over medium heat, combine the butter, milk and cocoa powder. Mix over heat until the butter is melted and the cocoa powder has dissolved into the milk. Remove from heat.

Combine the dry ingredients. In a large bowl, whisk together the flour, sugar, baking soda and salt.

Add the butter and cocoa powder mixture to the dry ingredients and whisk to create a thick batter. Then add the eggs to the batter and whisk until smooth. Add the Greek yogurt to the batter and whisk one more time until all ingredients are evenly combined.

Pour the batter into the prepared bundt pan. Bake for 45-50 minutes, until a toothpick inserted in the center comes out clean. Allow the cake to cool in the pan for 20 minutes before inverting it onto a cooling rack.

While the bundt cake is cooling, prepare the orange icing. Add the frosting mix, milk, and orange extract to a large bowl and mix until smooth.

Once the cake is cooled, pour the icing on top.

Allergen Friendly Chocolate Birthday Cake | Dairy-free | Egg-free | Gluten-free | Low Glycemic | Vegan

PinkCake_web.jpg

If you’re looking for an allergen or vegan-friendly birthday cake without all the sugar, but still satisfies your sweet tooth, here’s the recipe for you! This cake is perfect for birthdays, being free from allergens, so everyone can enjoy a slice.

PinkCake_Slice_web.jpg

Ingredients

3 cups Bob's Red Mill Gluten-free 1 - 1 Flour
1 ½ cups allulose sweetener (recommended Trader Joe’s allulose/stevia blend)
6 tbsp unsweetened cocoa powder
2 tsp baking soda
1 tsp salt
2 cups milk substitute
½ cup canola oil
2 tbsp apple cider vinegar
1 tsp vanilla

FROSTING
1 Color Kitchen Frosting Mix (choose your color!) with sprinkles

Directions

Preheat the oven to 350 degrees and oil two 9-inch cake pans.

In a medium bowl combine the flour, sweetener, cocoa powder, baking soda and salt.

In a smaller bowl blend milk substitute, oil, vinegar and vanilla.

Combine the wet ingredients into the dry ingredients and mix with a hand or stand mixer, scraping the sides of the bowl until fully blended.

Pour into cake pans and place in oven. Bake for 25 minutes, or until a toothpick comes out clean.

Cool before frosting.

For the frosting, try our Naturally Colorful Frosting Mix with Sprinkles.

Italian Rainbow Cookies | Sugar-Free | Gluten-free

ItalianCookiesBlog.jpg

A healthier, allergen-friendly take on the quintessential Italian dessert. Try with any color combination!

INGREDIENTS

ALMOND PASTE (makes approx. 8oz)
1 cup blanched almond flour
½ cup powdered monkfruit sugar
⅛ tsp salt
1 large egg white
½ tsp almond extract

COOKIES
8 oz almond paste
2 ½ sticks butter, cut into pieces + softened
2 cups gluten free 1:1 baking flour
1 cup granulated monkfruit
4 large eggs, room temperature, separate yolks from whites
½ tsp salt
2 tsp vanilla extract
1 tsp almond extract
1 Color Kitchen Pink Food Color packet
1 Color Kitchen Green Color packet

FILLLING
1 jar raspberry jam
10 oz chocolate

ItalianCookies2_sq.jpg

DIRECTIONS

Prepare the Almond Paste: Using a food processor with the blade attachment, add almond flour, powdered sugar + salt and pulse until mixed.

Add in almond extract and egg white and continue pulsing until a dough forms.

Remove the dough from the food processor, roll into a log and wrap in plastic wrap, storing in the fridge until ready to use. The almond paste can be prepared ahead and refrigerated up to 10 days prior to using. This recipe makes approx. 8oz of almond paste; you will use all of it in the cookie batter.

Prepare the Gluten Free Italian Rainbow Cookies: Position oven racks on upper and lower thirds of the oven and preheat to 350F.

Grease and flour 8x8 baking pans or line with parchment paper.

In the bowl of a stand mixer fitted with the paddle attachment, combine almond paste and ¾ cups plus 2 tbsp of monkfruit sweetener. Mix on medium speed until small crumbles form.

Next begin adding softened butter a few pieces at a time, continuing to mix on medium speed until well combined. Next, beat in egg yolks, vanilla, and almond extract until smooth. The batter will be pretty thick which is normal.

In a separate mixing bowl, sift 2 cups of flour and ½ tsp of salt together. Gradually add to batter, mixing on low speed until combined.

In another bowl, beat egg whites until foamy. Using an electric mixer or the whisk attachment on your stand mixer is best rather than doing this by hand. Once egg whites are frothy, beat in additional 2 tbsp of granulated monkfruit + continue to whisk until stiff peaks form.

Gently fold in ⅓ of the egg whites into the batter using a silicone spatula, then gently fold in the remaining egg whites. The batter will feel a little difficult to work with but will become easier and fluffier as you add the egg whites. It will still be slightly dense once the egg whites are fully incorporated.

Next, evenly distribute the batter into 3 separate bowls. Mine weighed approximately 350g each, but you can eyeball this step if you do not have a kitchen scale.

Color the Batter: Add 1 packet of pink coloring to one bowl, 1 packet of green to another, and leave the third bowl plain. Using a silicone spatula or mixing spoon, fold in coloring packets until fully combined.

Bake the Layers: Transfer each of the batters to three separate parchment lined 8x8 baking pans. Dip an offset spatula in water and use it to spread the batter evenly around the pan, ensuring you get it into the corners of the pan. Smooth out the tops.

Bake for 8-10 minutes or until edges are golden brown. Note: if you are using glass pans, baking time will take slightly longer, closer to 12-15 minutes.

When finished, allow cakes to cool completely on wire racks.

Assemble the Layers: Once cool, place the green layer onto a cool cookie sheet or cutting board to use as a base. Gently spread a thin layer of jam on top. Carefully slide the plain layer atop the green and gently spread another thin layer of jam on top. Slide pink layer on top.

Carefully cover the cake with plastic wrap and place a second clean pan on top. Top the pan with heavy objects like cans or bags of flour to weigh down the layers. Refrigerate 4 hours up to overnight.

Add the Chocolate Layer: After cake has chilled, remove plastic wrap and carefully trim any uneven edges. Flip onto a cooling rack so the green layer is now on the top. Place the cooling rack atop a parchment lined cookie sheet to catch any mess.

Melt chocolate in a heat proof bowl resting above a pot of simmering water (this creates a double boiler). Carefully pour over cake. Dip an offset spatula into the simmering water and use it to evenly spread the chocolate over top of and alongside the cake.

Cut the Italian Rainbow Cookies: Using a sharp knife, cut the cookies into 25 pieces. If you want clean edges, dip your knife in hot water and clean with a towel in between cuts.

Store in an airtight container up to 1 week at room temperature.

~ A Pretty Delicious Life


Rainbow Heart Petal Cake | Natural | Dye-free

RainbowCake_web.jpg

Love is Love…is LOVE! Decorate any of your favorite cakes with this skill that is simple to master.

Rainbow_Frosting_web.jpg

DIRECTIONS

Have prepared a fully frosted layered cake of at least 5-6 inches tall.

Prepare 6 small bowls for making “gel” colors (red, orange, yellow, green, blue, purple), by mixing 1 ¼ tsp of each color powder with ¼ tsp of water. Stir with a small spoon or brush until all the color is dissolved. For purple, mix 2 tsp of pink color and 2 tsp of blue color (If using packets, each packet is 2.5g - 1 ½ tsp).

Stir in a ½ pint of white vanilla frosting and allow color to develop for 10 minutes. Mix and add more color for a deeper saturation of color.

Prepare 3 baking trays with parchment paper.

Fit 6 pastry bags with a coupler tip and use a #32 piping tip.

Pipe many small 1 inch hearts left half then right half in each color. A 5-inch cakes needs at least 13 hearts for each color.

Rainbow_Petals_web.jpg

Freeze trays of hearts until frosting is fully firmed.

Starting from the bottom of the cake, pipe a small dollop of frosting to where the heart will be placed. Starting with purple, gently press a heart upon the cake. Alternate the following hearts upside down then rightside up.

Change colors with each row completed, beginning with purple, blue, green, yellow, orange, and red.

-Heather Wong - Pastry Chef, Flouring LA 

Inspired by Qookie The Cakery

Get Colors for the Rainbow Heart Petal Cake here

Red Velvet Cake | Artificial Dye-Free

red_velvet_slice_packet_web.jpg

Our plant-based Red Velvet Color can be mixed with cake mixes, or with recipes from scratch to make a deep, rich red velvety cake.

When baking from scratch, it’s important to substitute baking powder for baking soda, and to use a non-alkalized cocoa powder.

SUGGESTED USE: 1 packet (13 grams) red velvet powder to 1lb. dry cake mix.

INGREDIENTS

½ cup butter (room temp)
1 ½ cup organic sugar
2 eggs
1 tsp vanilla
2 tbsp cocoa powder (non-alkalized)
1 Red Velvet Color Kitchen Color packet (13 grams, 3 tbsp)
1 tsp salt
1 tsp baking powder
2 ½ cups flour
1 cup buttermilk
1 tbsp vinegar

DIRECTIONS

Heat oven to 350 degrees. Butter two 9-inch cake pans and lightly dust with cocoa powder.

Mix butter, sugar, eggs and vanilla.

In separate bowl mix dry ingredients: flour, red velvet powder color, cocoa powder, and salt.

Add vinegar to buttermilk.

Slowly add dry blend into butter mixture along with buttermilk/vinegar.

Divide batter evenly into 2 pans. Bake for 25-30 min. Cool on rack before frosting.

Easter Cake | Natural | Artificial Dye-free

EasterCake_0111.jpg

We absolutely love the Simple Mills and Color Kitchen collab — especially for something as cute as this!

Makes: 3 Layer 6” Cake (or 2 Layer 8” Cake)

Ingredients

2 boxes Simple Mills Vanilla Cake Mix
3 Jars Simple Mills Vanilla Frosting
1 Blue Color Kitchen Color packet
1 Green Color Kitchen Color packet
1 Orange Color Kitchen Color packet
1 Color Kitchen Rainbow Sprinkles

Directions

Follow the directions on the back of the box to bake the cake mix and pour into either 3 6” cake pans or 2 8” cake pans.

Once the cake is cooled, remove from pans.

In a mixing bowl, or in your stand mixer fitted with the paddle attachment, add 2 jars of frosting and 1 packet of ColorKitchen Blue and mix to combine completely.

On a cake stand, plate or spinner, add a small dollop of frosting and place the first cake layer. Add a generous amount of frosting and spread to cover the layer evenly. Top with the second cake layer, and repeat this process. Frost the rest of the cake with the blue frosting.

EasterCake_0068.jpg

Divide the last jar of frosting into two bowls. In the first add ColorKitchen Orange packet and stir to combine completely. In the second, add the ColorKitchen Green packet and stir to combine completely.

In a piping bag with decorating tip #133, add the green frosting. You will use this for the grass and for the carrot tops. Set aside.

In a piping bag with a coupler, add the orange frosting and decorating tip #104. This will be used for the carrots.

First, pipe grass all the way around the boarder of the cake.

Next, with the larger side of tip #104 up against the cake and the smaller side closer to you, pipe a line going back and forth to create a carrot shape. Do this around the entire cake, or anywhere that you want carrots. You can make them varying sizes and heights, have fun with it

Using the green frosting, pipe little dollops on the tops of all carrots to create the tops.

Switch out the decorating tip #104 for #96 in the orange and pipe a boarder around the top of the cake.

Sprinkle the top with ColorKitchen Rainbow Sprinkles.

Rainbow S'more Cake | Gluten-free

SmoreCake_Web.jpg

This decadent cake is deliciously gluten-free and filled with marshmallow fluffy goodness. Topped with little cookie sandwiches and sprinkles, it will leave you wanting s’more!

smore_cake.jpg

INGREDIENTS

CAKE

2 boxes Pamelas Chocolate Graham crackers
¾ cup butter
1 box vanilla cake mix (suggested Pamelas gluten free + ingredients listen on the box)
1 cup mini chocolate chips

MARSHMALLOW BUTTERCREAM

5 Color Kitchen Color packets (pink, orange, yellow, green, blue)
1 cup (2 sticks) butter, softened but still cool
1- 7 oz jar marshmallow fluff
1 tsp vanilla
2-3 tbsp cream
4 cups powdered sugar

VANILLA BUTTERCREAM

1 cup (2 sticks butter) softened but still cool
1 tsp vanilla
2-3 tbsp cream
4 cups powdered sugar

GANACHE

1 cup heavy cream
1 cup semisweet chocolate chips

MINI MARSHMALLOW SANDWICHES

Pamelas cinnamon graham crackers
Mini marshmallows

GARNISHES

Mini chocolate chips for a border along the base.
Semisweet chocolate chips and mini marshmallows for the top.
1 Color Kitchen Rainbow Sprinkles packet

DIRECTIONS

Grease 3- 6" cake pans and line the bottoms with parchment paper. In a food processor, grind the chocolate graham crackers until become fine crumbs. Melt butter and add it to the graham cracker mixture. Stir until it's completely combined. Divide the mixture between all 3 pans and smooth into an even layer.

Prepare the cake mix according to the package directions. Fold in chocolate chips. Spread evenly on top of the graham cracker layer in all 3 pans.

Bake according to package directions.

Let cool completely and transfer to the fridge until making the cake.

In a bowl, beat 1 cup of butter until smooth. Add in marshmallow fluff and vanilla. Mix until smooth. Add the powdered sugar and cream- alternate adding 1 cup of powdered sugar and cream until it's fully incorporated.

Divide the marshmallow buttercream into 5 bowls. In each bowl add a different color packed. Use as much powder as you would like for the desired shade.

Remove the cake from the fridge and place the first layer on a cake board. Pipe a circle of pink in the center of the cake. Next, pipe and orange ring of frosting around the pink. Continue to do this with each color until you finish with blue on the outside.

Stack the second layer on top of the buttercream. Repeat the rainbow frosting pattern, but reverse it, starting with blue on the inside.

Flip the last layer of cake over (so that the bottom becomes the top of the cake) and stack it on top of the buttercream.

You will have left over buttercream, save this for the decorations on top.

Refrigerate for 15 minutes.

In another bowl, beat one cup of butter until smooth. Add in vanilla and mix until smooth. Add the powdered sugar and cream, alternating until it's completely mixed. Remove the cake from the fridge and frost the cake with a crumb coat. This is just a thin layer of frosting to prevent crumbs from showing on the final layer. Refrigerate again for 15 minutes. Frost the outside and top of the cake with the rest of the vanilla frosting. To get smooth sides using a cake scraper and an offset spatula to smooth the top. Place in the freezer or fridge for at least ten minutes.

smore_cake_top.jpg

Place the cake on a turntable and/or place a rimmed baking sheet underneath it. Using your hand, press a small layer of mini chocolate chips onto the base of the cake.

In a small bowl, heat 1 cup of heavy cream for 1 minute. Add 1 cup of chocolate chips and make sure they're covered with the cream. Wait 60 seconds and then whisk it with a spatula until smooth. Make sure that the cake is cold and the ganache has cooled for about 10 minutes. Using a squirt bottle or spoon, drizzle the ganache on the outside of the cake. Refrigerate until firm and then add more ganache to the top filling in whole area. Refrigerate again until set.

Once set, sprinkle rainbow jimmies along the outside rim of the cake.

Cut a sheet of plastic wrap and lay it on a flat surface. Pipe each color (from the marshmallow buttercream) onto the plastic wrap vertically. It will look like a tall straight rainbow of buttercream. Picking up one side, roll the plastic wrap so that all of the colors are now together in one cylinder of buttercream. Place this into a piping bag with a 1M tip. Pipe swirls of rainbow frosting onto the top of the cake. Refrigerate for 5 minutes.

On a microwave safe plate, set out 7-8 cinnamon crackers or as many swirls as you made. Place one marshmallow on top and then another cracker. Microwave in 5 second intervals until melted. Top each rainbow swirl with a "marshmallow sandwich."

In the top center of the cake, fill with additional marshmallows and chocolate chips.

-Recipe courtesy of Taryn Camp From Life and Sprinkles 

Unicorn Cake

All natural colored Unicorn Cake

This is a little girl’s absolute dream come true, and we’re here to make it easier for you! Let’s have fun!

MAKES 3 Layer 6” Cake

Cake:
1 stick (113 g.) organic butter, softened
170 g. organic sugar
1 tsp. organic vanilla extract
2 organic large eggs
½ cup organic milk
170 g. all natural cake flour
½ tsp. baking powder
½ tsp. sea salt
Pink Color Kitchen Color packet
Color Kitchen Rainbow Sprinkles

Cake Frosting:
1 ½ sticks organic butter
340 g. organic powdered sugar, sifted
1 tsp. organic vanilla extract
1-2 tsp. water

Decorating Frosting:
1 ½ sticks organic butter
340 g. organic powdered sugar, sifted
1 tsp. organic vanilla extract
1-2 tsp. water
Pink, Green and Blue Color Kitchen Color packets

Unicorn Horn & Ears:
1 organic ice cream cone (such as Three Twins, find here)
57 g. (2 oz.) organic white chocolate, chopped
all natural white sprinkles
1 organic graham cracker (such as Annie’s Organic Honey Grahams, find here)

directions:

Preheat oven to 350 degrees.

In the bowl of your stand mixer fitted with paddle attachment, add the butter, sugar and vanilla extract. Mix on low until combined and you have no butter chunks.

Add the eggs and mix just slightly.

In a separate bowl, add the cake flour, baking powder and sea salt and whisk together.

UnicornCakeSlice_0003.jpg

Add the milk and the cake flour mixture into the mixing bowl and mix on low until you have a smooth cake batter. Scrape the sides of the bowl and mix again if needed so there are no chunks.

Separate the cake batter into three bowls, they should weigh about 218 g. each. In one bowl, add ¼ tsp. ColorKitchen Pink Dye, in the second add ½ tsp. ColorKitchen Pink Dye and in the last bowl add 1 tsp. ColorKitchen Pink Dye. Stir to combine all of them completely.

Line three 6” cake pans with parchment paper and pour batter into each one and spread evenly.

Bake for 17 minutes or until a wooden pick inserted in center comes out clean.

While the cake is baking, in a double boiler add the white chocolate and melt until completely melted.

Once the white chocolate is melted spread it all over the ice cream cone and sprinkle it with the white sprinkles. Once it is completely covered in sprinkles, place it on a cookie sheet or plate and put in the freezer.

Once the cakes have cooled, remove them from the cake pans and make the cake frosting.

In the bowl of your stand mixer add the butter, powdered sugar, vanilla extract and water. Mix on low until all ingredients are combined then speed mixer up to high for 1 minute or until light and fluffy. Scrape bowl if needed and mix again.

On a cake stand or spinner, place a small amount of frosting and put the darkest cake later first. Then spread a generous amount of frosting, sprinkle rainbow sprinkles and then top with the second darkest cake layer. Repeat this process again and top with the lightest pink cake layer. For a full crumb coat tutorial, find one here.

Finish frosting the cake smooth.

After you have frosted the cake smooth, use the same bowl to make the decorating frosting following the same instructions as the cake frosting that you just made.

all natural purple frosting

In a small dish, add ¼ tsp. ColorKitchen Pink Dye and ¼ tsp. ColorKitchen Blue Dye and ¼ tsp. water, mix together to create dark purple dye.

Add a very little bit of frosting and stir to combine completely. Put in a piping bag with decorating tip #4.

Pipe eyes with eye lashes on the front top part of the cake. You won’t need this dark purple frosting after this.

To make the ears, cut rounded triangle shapes out of the graham cracker.

Next add a small amount of frosting into a piping bag with decorating tip #8 or similar. Frost the inner part of the ear and cover in white sprinkles.

Using the piping bag with the decorating tip #8, pipe frosting onto the bottom of the ears and the bottom of the horn and stick them onto the cake. I put the ears a little more forward than the horn.

You can put the remaining frosting from the piping bag with tip #8 back into the mixing bowl with the rest of the white.
Get three mixing bowls and in the first bowl add 1/8 tsp. ColorKitchen Green Dye, ¼ tsp. ColorKitchen Blue Dye and ¼ tsp. water and mix to combine into a turquoise food coloring.

Unicorn Cake frosting

In the second bowl, add 1/8 tsp. ColorKitchen Blue Dye, 1/8 tsp. ColorKitchen Pink Dye and ¼ tsp. water and mix to combine into lavender food coloring.

In the third bowl, add 1/8 tsp. ColorKitchen Pink Dye and ¼ tsp. water to combine into pink food dye.

Divide the remaining frosting into the three bowls, adding more into the turquoise than the pink and lavender.

Stir to combine the frostings into the three colors.

Put the turquoise frosting in a piping bag with decorating tip #846. Put the lavender frosting into a piping bag into a piping bag with decorating tip #96. And put the pink frosting into a piping bag with decorating tip #32.

Starting right between the eyes, pipe rosettes with the purple frosting up into the middle of the cake.
Fill in with piping dollops with the pink, and then towards the back start the main by piping roses with the turquoise.

Fill in with purple, pink and blue however you want – this is the fun part and you can make it look however you want!

Baker’s Note: Make this cake gluten free by substituting the cake flour for an organic gluten free flour blend. Our favorite is Namaste Perfect Flour Blend.

Recipe by Mimi's Cookie Bar

http://www.colorkitchenfoods.com/products/unicorncolors

Succulent Cake with the Ultimate Colorful Black Frosting | Natural | Dye-free

NaturallyColoredBlackSucculentCake_Blog.jpg

Have you been searching for a way to make a natural black frosting? We've got the ultimate black frosting recipe to make an amazing naturally colorful Black Succulent Cake! 

MAKES 3 Layer 6” Cake

Ingredients

CAKE
1 stick (113 g) organic butter, softened
198 g (¾ cup + 2 tbsp) organic sugar
1 tsp organic vanilla extract
3 (102 g) organic egg whites
½ cup organic milk
170 g (1 cup + 3 tbsp) all natural cake flour
½ tsp sea salt
½ tsp baking powder

BLACK FROSTING
1 ½ sticks (170 g) organic butter, softened
340 g (2 ½ cups) organic powdered sugar, sifted
2 tsp all natural almond flavor
1 tsp organic vanilla extract
1 tbsp food grade raw activated charcoal *
2-3 tsp water

SUCCULENT FROSTING
For Lavender – use tip #126
¾ stick (85 g) organic butter, softened
170 g (1 cup + 3 tbsp) organic powdered sugar
⅛ tsp Blue Color Kitchen Color
⅛ tsp Pink Color Kitchen Color
1-2 tsp water

For Dark Green – use tip #104
¾ stick (85 g) organic butter, softened
170 g (1 cup + 3 tbsp) organic powdered sugar
½ tsp Blue ColorKitchen Color 
1 tsp Green ColorKitchen Color 
⅛ tsp food grade raw activated charcoal *
1-2 tsp water

For Green – use tip #75
¾ stick (85 g) organic butter, softened
170 g (1 cup + 3 tbsp) organic powdered sugar
½ tsp Blue ColorKitchen Color 
1 tsp GreenColorKitchen Color 
1-2 tsp water

For Dark Turquoise - use tip #8
Extra green frosting
a pinch of raw activated charcoal *
¼ tsp Blue ColorKitchen Color

Tools
Cake spinner (optional)
Cake spatula
Ateco decorating tips #126, 104, 75, 199, 32, 8
4 piping bags
3 couplers
decorating nail (find here)
parchment paper

Directions

Cut parchment paper into 3 inch squares and have ready for later. You’ll want as many squares as you’ll have succulents.

Preheat oven to 350 degrees.

Line three 6” cake pans with parchment paper or grease and flour.

In the bowl of your stand mixer fitted with whisk attachment, whisk egg whites at medium/high speed until stiff peaks form.

Transfer to a separate bowl and set aside.

In the bowl of your stand mixer fitted with paddle attachment (no need to wash), cream the butter, sugar and vanilla extract until smooth.

In a separate bowl whisk together the cake flour, baking powder and sea salt.

Add in the cake flour mixture to the butter mixture alternately with milk, beginning and ending with cake flour.

Gently fold the egg whites into cake batter until smooth.

Measure batter evenly into each cake pan, about 225 g. each.

Bake for 17 minutes or until a wooden pick inserted in center comes out clean.

Allow cakes to cool or place in the freezer while you make the succulents.

In a clean bowl of your stand mixer fitted with paddle attachment, make the lavender frosting first. Add the butter, powdered sugar, blue dye, pink dye and water and mix on low until combined. Then speed mixer up to high for 1 minute or until light and fluffy. Put the frosting in a piping bag with decorating tip #126.

Using a decorating nail, place a small dollop of frosting on the nail. Then place a square of parchment paper on the nail so it sticks.

With your piping bag turn it so the thick side of the tip is on the bottom and the thinner side is on the top. Pipe a circle, creating a cone. Then pipe another one right on top of it.

BlackSucculentCakeRoseFrosting.jpg

Next, holding your piping bag the same way, pipe an upside down “U” on top of the cone. Then pipe 2 more to create a circle around the cone. You have now created the first layer of your rose. Continue to pipe upside down “U” shapes around the center until you have a larger succulent looking rose. Pull the parchment paper off the nail and place on a baking sheet and place in the freezer.

I piped about 4 of these so I could pick the ones I liked best for the cake. Pipe them until you have ones you like, you can even put the frosting back into the bag if you don’t like how it looks and you’re practicing. Just make sure to save some of the lavender frosting, at least a third of it.

Next, make the dark green frosting. In a clean bowl of your stand mixer fitted with paddle attachment, add the butter, powdered sugar, blue dye, green dye, activated charcoal and water. Mix on low until combined, then speed mixer up to high for 1 minute or until light and fluffy.

In a piping bag with a coupler and decorating tip #104 put half the dark green frosting in on one side and the rest of the lavender frosting on the other side, it doesn’t have to be perfect.

Using the decorating nail again, pipe a dollop of frosting on it and place a square of parchment paper.

With the piping bag facing straight down and the large side in the center, pipe a spiral.

Next, going around the spiral, pipe upside down “U”s again creating petals.

Do a couple layers to create however tall you want the succulent to be.

Pull the parchment paper off the nail and place the baking sheet in the freezer.

Save some of the two toned frosting and change out the tip for decorating tip #32, you’ll use this to fill in the top of the cake later.

Next, make the green frosting. In a clean bowl of your stand mixer fitted with paddle attachment, add the butter, powdered sugar, green dye, blue dye. Mix on low until combined, then speed mixer up to high for 1 minute or until light and fluffy. Put about half of the frosting in a piping bag with a coupler and do not put a decorating tip in just yet.

On a square of parchment paper, pipe a large dollop of frosting. However tall you make this mound will be how tall this plant is.

Now add the decorating tip #75.

Starting at the top, pipe a line down to the bottom. Then directly across from that line do the same thing so half of the dome has a line down to the bottom.

Next, pipe a line down to the bottom from half way between those two lines on each side, so you have four lines going down to the bottom. This will help keep your plant symmetrical.

Next fill in the holes with lines going from the top to the bottom. The bottom doesn’t have to be perfect because you can trim this later. I just used a knife to trim off the edges so it was smooth. Place the parchment paper square on the baking sheet with the rest of the plants in the freezer.

Remove the decorating tip and replace it with decorating tip #199. You will use this later to fill in the top of the cake.

With the other half of the green frosting, add the blue dye and a pinch of activated charcoal. Stir to combine completely so you have a dark turquoise frosting. Put in a piping bag with a coupler but do not put a tip in just yet.

BlackSucculentCakeRoses.jpg

On a square of parchment paper, pipe a large dollop of frosting exactly like you did with the green.

Now put the decorating tip #8 in the coupler.

Just pipe spikes coming out of the middle of the dollop, going all the way around.

Pipe another set on top, placing them in between each of the bottom ones and continue up until the circle is full of spikes. Place this on the baking sheet with the rest of the plants and keep the baking sheet in the freezer until you are ready to assemble the cake.

By this time your cake should be cooled and ready to assemble. So it’s time to start the black frosting. In the bowl of your stand mixer fitted with paddle attachment, add the butter, powdered sugar, activated charcoal, vanilla extract and almond flavor. Mix on low until all ingredients are combined then speed mixer up to high for 1 minute or until light and fluffy. I found the charcoal dried out the buttercream just a little so add a little water if you would like it a little more loose.

On a cake stand, plate or spinner stack, frost and crumb coat your cake. You can find a tutorial here.

Next frost your cake smooth. And now you are ready to start assembling the succulents!

Remove your succulents from the freezer. In order to stick them to the cake, just pull them off the parchment paper and place a dollop of frosting on the bottom and stick to the cake.

BlackSucculentCake_0059.jpg

Once you have stuck all the larger succulents on the cake and filled it how you like, just fill in the empty spaces with dollops of the green and green/lavender frosting.

Baker’s Note: You can make the succulents 24 hours in advance, just store them in the freezer! Also, to make this cake gluten free just substitute the all natural cake flour for an organic gluten free flour blend, our favorite is Namaste Organic Perfect Flour Blend.


High Altitude – bake at 350 degrees for 17 minutes

-recipe by Dessert’D Organic Bake Shop


* COLORKITCHEN, INC. ASSUMES NO LEGAL RESPONSIBILITY FOR USE OR RELIANCE UPON INGREDIENT RECOMMENDATIONS.


Mermaid Cake | Natural | Dye-free

Mermaid Cake

A cake for your mermaid birthday party that will never be forgotten!

MAKES: 6 Layer 6” Cake

Ingredients

CAKE
2 sticks (226 g.) organic butter, softened
340 g organic sugar
2 tsp organic vanilla extract
4 organic large eggs
1 cup organic milk
340 g all natural cake flour
1 tsp sea salt
1 tsp baking powder

mermaid cake

BASE
3 sticks (340 g) organic butter, softened
680 g organic powdered sugar, sifted
1 tbsp + 1 tsp organic vanilla extract
2 tsp water
½ ColorKitchen Blue Color packet

WAVE
1 stick (113 g) organic butter, softened
226 g organic powdered sugar, sifted
½ ColorKitchen Blue Color packet
2 tsp water

MERMAID
1 stick (113 g) organic butter, softened
226 g organic powdered sugar, sifted
1 tbsp water
1 Color Kitchen Blue Color packet
1 Color Kitchen Pink Food Color packet
1 Color Kitchen Green Color packet

SAND
4 organic graham crackers

Tools:
6 – 6” cake pans
parchment paper
piping bags
decorating tips #864, 199, 21, 32, 15, 56, 4
cake spinner
cake round (optional)
cake spatula
bench scraper

Directions

Preheat oven to 350 degrees.

In the bowl of your stand mixer fitted with paddle attachment, cream the butter, sugar and vanilla extract.

Add the eggs and mix on low until combined, scraping sides of bowl if necessary.

mermaid birthday party

In a separate bowl, add the cake flour, baking powder and sea salt and whisk together.

Add the milk and cake flour mixture to the mixing bowl, and mix on low until you have a smooth cake batter.

Separate the cake batter into 3 different bowls, each should weigh about 450 g. each.

In the first bowl, add 2 tsp. Color Kitchen Foods Blue Dye. In the second bowl, add 1 tsp. Color Kitchen Foods Blue Dye. And, leave the last bowl without color. This will create an ombre cake once it is baked.

Next, line the six 6” cake pans with parchment paper.

Pour batter evenly into each cake pan about 227 g each, all colors should be poured into 2 cake pans, so you’ll have 2 cake layers of each color.

Bake for 17 minutes or until a wooden pick inserted in center comes out clean.

Once the cakes have cooled, start the frosting for the base layer. This the light blue frosting that the entire cake is frosted with. In your stand mixer fitted with paddle attachment, add the butter, powdered sugar, blue dye and water. Mix on low until all ingredients are combined, then speed mixer up to high for 1 minute or until light and fluffy.

Place the darkest cake lay on a cake spinner or stand. Place a generous amount of frosting and spread evenly. Top with the second cake layer that is the same color.

Repeat this process with the next shade of blue and then the white.

Crumb coat the cake, and then frost it so it is smooth. You don’t have to worry about getting the bottom part of the cake super smooth because you are going to cover it up with the waves anyways.

Now it’s time to make the waves frosting. In the bowl of you stand mixer fitted with paddle attachment, add the butter, powdered sugar, blue dye and water. Mix on low until all ingredients are combined, then speed mixer up to high for 1 minute or until light and fluffy.

Put in a piping bag with decorating tip #864. Pipe a wave motion, it should feel like you’re drawing a sideways “S”.  

Next, it’s time to make the Mermaid frosting. In the bowl of your stand mixer fitted with paddle attachment, add the butter, powdered sugar and water. Mix on low until all ingredients are combined, then speed mixer up to high for 1 minute or until light and fluffy.

Once the Mermaid frosting is made, separate it into 3 bowls. They should weigh 113 g. each. In the first bowl, add ½ tsp. green dye and stir to combine completely. In the second bowl, add ½ tsp. blue dye and ½ tsp. pink dye and stir to combine completely. In the last bowl, add ½ tsp. blue dye and ½ tsp green dye, and stir to combine completely. You will end up with green, purple and teal.

Put the Mermaid frosting in piping bags with decorating tips. I used #56 for the teal, #4 for the purple and #15 for the green. Then I switched them out a couple times for #262 and #24. You can use any tips you like, I just found that the smaller ones that resembled star tips worked the best for filling in the scales.

Draw Mermaid fins around the cake. I got 4 Mermaid fins total, but you can do more or less. I piped scales on all the fins and then just filled in randomly with colors. This is your opportunity to have fun and do freestyle!

Once the Mermaid fins are complete, switch out the tips for #199, #21 and #32 and pipe dollops on the top all the way around the cake for the boarder.

If you want to add sand to the top, add the graham crackers to a food processor and grind until you have a sand like texture. Sprinkle the sand all on the top of the cake.

Eat cake!

Baker’s Note: To make this cake gluten free, just substitute the all natural cake flour for an organic gluten free flour mix. Also, make sure to either omit the sand or use gluten free graham crackers.

~ Mimi's Cookie Bar


Best Naturally Colored Rainbow Cake

Naturally Colored Rainbow Cake

Naturally colorful layered rainbow cake made with plant-based colors.

Ingredients

2 cups white sugar
1 cups butter
4 eggs
4 tsp vanilla extract
3 cups all-purpose flour
3 ½ tsp baking powder
1 cup milk
2 Yellow Color Kitchen Color packets
1 Orange Color Kitchen Color packet
2 Pink Color Kitchen Color packets
2 Green Color Kitchen Color packets
2 Blue Color Kitchen Color packets

Directions

Preheat oven to 325 degrees F. Grease and flour five 6 inch cake pans (¾" thick). Each pan holds a generous ½ cups batter. Wilton offers a complete set of 5. Thin layers are needed for a shorter bake time to reduce color fading

Cream together the sugar and butter in a medium sized bowl. Next, beat in the eggs, and then stir in the vanilla. In another bowl, combine flour and baking powder. Add to the creamed mixture and blend thoroughly. Next add milk and stir until smooth.

For yellow, in a small bowl, mix 2 yellow packets with just a couple drops of water. Stir until dissolved. Add color to a generous ½ cups of batter and blend. Pour or spoon batter into the prepared pan.

For orange, in a small bowl, mix 1 orange packet with just a couple drops of water. Stir until dissolved. Add color to a generous ½ cups of batter and blend. Pour or spoon batter into the prepared pan.

For pink, in a small bowl, mix 2 pink packets with just a couple drops of water. Stir until dissolved. Add color to a generous ½ cups of batter and blend. Pour or spoon batter into the prepared pan.

For green, in a small bowl, mix 2 green packets with just a couple drops of water. Stir until dissolved. Add color to a generous ½ cups of batter and blend. Pour or spoon batter into the prepared pan.

For blue, in a small bowl, mix 2 blue packets with just a couple drops of water. Stir until dissolved. Add color to a generous ½ cups of batter and blend. Pour or spoon batter into the prepared pan.

Bake for 20-25 minutes. Use a toothpick to see if batter is baked in the middle. 

When cakes are done, let cool completely before frosting.